
My Petrol Chainsaw will not tension the chain correctly
Modified on Mon, 6 Jul at 11:32 AM
If the chain on your Challenge PCS38Z petrol chainsaw will not tension correctly, the most common causes are an engaged chain brake, an incorrectly positioned tensioner pin or an incorrectly adjusted guide bar.
Correct chain tension is essential for safe operation, efficient cutting and reducing wear on the chain and guide bar.
Quick Answer
If your chainsaw chain will not tension correctly:
- Disengage the chain brake.
- Loosen the two guide bar nuts.
- Check the tensioner pin is correctly located in the guide bar.
- Adjust the chain using the internal tensioning screw.
- Hold the tip of the guide bar upwards while setting the tension.
- Tighten the guide bar nuts securely.
- Check that the chain moves freely and can be lifted slightly from the guide bar.
If the chain still cannot be tensioned, inspect the guide bar, chain and tensioning mechanism for wear or damage.
Before You Begin
Before adjusting the chain:
- Switch off the engine and allow it to cool completely.
- Remove the spark plug cap to prevent accidental starting.
- Place the chainsaw on a stable, level surface.
- Wear suitable personal protective equipment (PPE), including cut-resistant gloves.
This guide applies to Challenge petrol chainsaws.
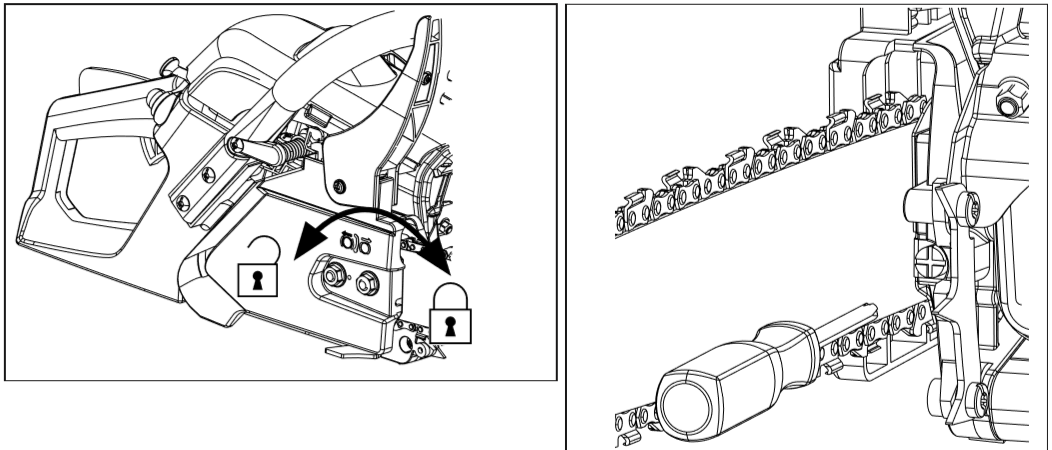
Steps
Step 1 – Disengage the Chain Brake
Ensure the chain brake is fully released.
The chain must be free to move around the guide bar before it can be adjusted correctly.
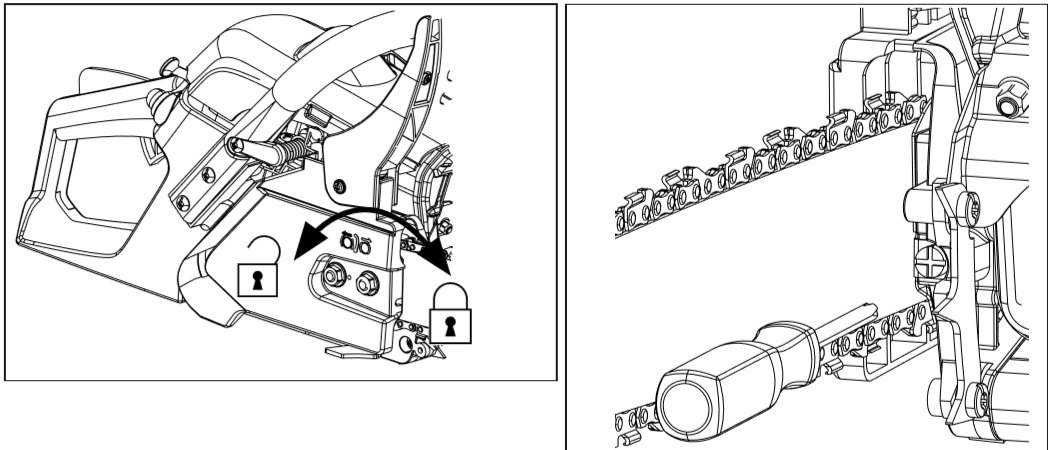
Step 2 – Loosen the Guide Bar Nuts
Using a suitable spanner:
- Loosen the two guide bar retaining nuts.
- Do not remove the nuts completely.
This allows the guide bar to move during adjustment.
Step 3 – Check the Tensioner Pin
Inspect the chain tensioner pin.
Ensure it is correctly located in the guide hole on the guide bar.
If the tensioner pin is not engaged, the guide bar will not move when the tensioning screw is turned.
Step 4 – Adjust the Chain Tension
Using the internal tensioning screw:
- Turn the screw gradually to adjust the chain tension.
- Hold the tip of the guide bar upwards while making the adjustment.
Continue until:
- The chain sits correctly in the guide bar groove.
- The chain can be lifted slightly from the guide bar.
- One drive link can be pulled clear before the chain returns into position.
Do not overtighten the chain, as this can increase wear on the chain, guide bar and engine.
Step 5 – Tighten the Guide Bar Nuts
While continuing to support the guide bar:
- Tighten both guide bar nuts securely.
- Ensure the guide bar remains in position while tightening.
Step 6 – Check the Chain
Rotate the chain by hand while wearing protective gloves.
Confirm that:
- The chain moves smoothly around the guide bar.
- The chain remains correctly tensioned.
- The guide bar is securely fitted.
Re-adjust the chain if necessary before using the chainsaw.
Frequently Asked Questions
Why won't my chainsaw chain tighten?
The most common causes are an engaged chain brake, an incorrectly positioned tensioner pin, loose guide bar nuts or a worn chain tensioning mechanism.
How tight should the chainsaw chain be?
The chain should sit firmly in the guide bar groove while still being able to lift slightly from the bar, exposing one drive link before returning into position.
Why do I need to lift the guide bar while adjusting the chain?
Supporting the guide bar removes movement from the mounting points and helps ensure the chain remains correctly tensioned after the guide bar nuts are tightened.
Why does the chain become loose again after tightening?
This can happen if the guide bar nuts are not fully tightened, the guide bar moves during adjustment or the chain has stretched through normal use.
Can I use the chainsaw if the chain won't tension correctly?
No. Operating a chainsaw with an incorrectly tensioned chain increases the risk of chain derailment, poor cutting performance and damage to the guide bar or sprocket.
What should I do if I still can't tension the chain?
Inspect the chain, guide bar and tensioning mechanism for wear or damage. If all components appear to be fitted correctly and the problem persists, contact technical support for further assistance.
Was this article helpful?
That’s Great!
Thank you for your feedback
Sorry! We couldn't be helpful
Thank you for your feedback
Feedback sent
We appreciate your effort and will try to fix the article