Lawnmower
Lawnmower
Petrol Lawnmower Products

How do I start my Petrol Lawnmower
Before operating your lawnmower, it is essential that you have read and understood the instruction manual supplied with your machine.
Quick Answer
To start a petrol lawnmower, you must check the oil and fuel levels, prime the engine if required, engage the safety/start lever, and pull the starter cord firmly. If the mower is difficult to start, the start cable tension may also need adjustment.
⚠️ Safety Notice
Before starting your lawnmower:
- Read and understand the instruction manual
- Wear suitable personal protective equipment (PPE)
- Operate on a clear, flat surface
- Keep children, pets, and bystanders away
- Handle petrol carefully — it is highly flammable
Failure to follow safety guidance may result in injury or damage.
Before You Start
Check the following before attempting to start the mower:
Engine Oil
- Ensure the engine contains the correct oil level
- Use the dipstick to confirm oil is between MIN and MAX marks
- Most mowers use SAE 30 oil (or equivalent), but always check your manual
Fuel
- Use fresh unleaded petrol (ideally less than 30 days old)
- Ensure the tank has sufficient fuel
Starting Your Petrol Lawnmower
Step 1 – Prime the Engine (If Fitted)
If your mower has a primer bulb:
- Press the primer bulb 3–4 times
- This helps fuel reach the carburettor for easier starting
If your model does not have a primer bulb, skip this step.
Step 2 – Position the Starter Cord
- Pull the starter handle gently
- Place it into the rope guide on the handlebar
- Ensure it is seated securely
Step 3 – Start the Engine
- Pull and hold the engine brake/start-stop lever against the handle
- Pull the starter cord sharply and smoothly
- Repeat until the engine starts
Cold engines may require several pulls.
Once running, keep holding the brake lever while operating the mower.
Checking Start Cable Tension
A loose or incorrectly adjusted cable can prevent the engine brake system from engaging, resulting in starting issues.
Tools Required
- 10 mm spanner
- 13 mm spanner
Identifying a Loose Cable
Check the cable near the handle assembly:
- Excess slack or movement indicates adjustment is required
- The cable should be firm but not overly tight
Adjusting the Cable
Step 1
Locate the cable adjustment bolt on the handle.

Step 2
Loosen the locking nut using the spanners.

Step 3
Adjust the tension:
- Tighten or loosen until slack is removed
- Ensure the brake lever engages correctly when pulled
Step 4
Retighten the locking nut securely.
The correct position is typically mid-way along the threaded adjustment bolt.
Frequently Asked Questions
Why won’t my lawnmower start?
Common causes include:
- Old or stale fuel
- Low engine oil
- Incorrect priming
- Loose or faulty start cable
Do all lawnmowers have a primer bulb?
No. Some models start without priming and rely solely on the choke and fuel system design.
How many pulls should it take to start?
A cold engine may take several pulls. If it does not start after repeated attempts, recheck fuel, oil, and cable tension.
Can a loose cable stop the mower starting?
Yes. If the engine brake is not fully disengaging, the engine may not start or may immediately cut out.
View ArticleHow do I assemble the handles on my Petrol Lawnmower
Quick Answer
To assemble your petrol lawnmower handles, fit the lower handles into the mower chassis first, then assemble the upper handles using the bolt, washer, and quick-release clamp system. Correct orientation is essential to avoid cable tension issues and ensure safe operation.
⚠️ Safety Notice
Before starting:
- Ensure the mower is switched off and cannot start accidentally
- Work on a flat, stable surface
- Keep fingers clear of pinch points during assembly
- Do not force components into place
Incorrect assembly may affect safety controls and cable operation.
Before You Begin
- Lay out all parts before assembly
- Check that all bolts, washers, and clamps are present
- Refer to your model manual where available
- Identify upper and lower handle sections clearly
Most petrol lawnmowers use a similar handle assembly system, but small variations may apply.
Assembling the Upper Handles
Step 1 – Insert the Bolt
- Insert the bolt from the inside of the handle frame
- Ensure the bolt head sits against the inner tube of the handle
This provides correct clamping pressure when tightened.

Step 2 – Fit the Washer
- Place the washer onto the threaded end of the bolt (outside of the handle)
- Ensure it sits flat against the handle tube
Step 3 – Fit the Quick-Release Clamp
- Thread the quick-release clamp lever onto the bolt
- Tighten until the handle sections are firmly secured
Step 4 – Lock the Clamp
- Press the lever down into the locked position
- The upper handle should now be firmly attached to the lower handle
Connecting the Lower Handles to the Mower
Lower handle installation depends on model type:
Slot-In Design
- Insert lower handles into chassis mounting points
- Push firmly until fully seated
- Some resistance is normal
Bolted Design
- Align mounting holes with the mower chassis
- Insert bolts and tighten securely
- Do not overtighten
Ensuring the Handles Are Fitted Correctly
Correct alignment is essential for safe operation.
Cable Routing Check
When viewed from behind the mower:
- The engine brake/start-stop cable should run neatly down one side
- The self-propel cable (if fitted) should follow the same route
- Cables must not be twisted, stretched, or trapped
Control Check
Before use:
- Pull and release all control levers
- Ensure they move freely
- Ensure they return smoothly to the rest position
If controls feel tight or do not return properly, recheck handle alignment.
Troubleshooting
Handles feel loose after assembly
- Check quick-release clamp is fully locked
- Ensure washers are correctly fitted
- Confirm bolts are tightened properly
Cables feel too tight after assembly
- Handles may be fitted in the wrong orientation
- Check cable routing and alignment
- Ensure cables are not trapped under brackets or fixings
Quick-release clamp will not tighten
- Verify bolt is inserted from the correct side
- Check washer is in the correct position
- Ensure clamp lever is correctly threaded onto the bolt
Frequently Asked Questions
Why do my mower handles feel unstable after assembly?
This is usually caused by:
- Loose quick-release clamps
- Incorrect washer placement
- Bolts not fully tightened
Can I assemble the handles without tools?
Basic assembly can be done by hand, but some models may require a spanner to secure bolts properly.
Why are my control cables tight after assembly?
This is usually due to incorrect handle orientation, which places tension on the brake or drive cables.
What happens if I fit the handles the wrong way round?
Incorrect installation can:
- Prevent the engine brake from working correctly
- Cause self-propel cables to over-tension
- Affect safety and operation
Should I force the handles into place?
No. If parts do not align easily, recheck orientation and fixings. Forcing components can damage the frame or cables.
How do I check that the self propel cable is tensioned correctly on my Petrol Lawnmower
Quick Answer
If your self-propel system is not engaging properly, the most common cause is incorrect cable tension. The cable should have a small amount of free play (typically 5–10 mm). Too much slack will prevent the drive system from engaging correctly.
⚠️ Safety Notice
Before carrying out any checks or adjustments:
- Ensure the mower is switched off and cannot start accidentally
- Disconnect the spark plug cap where possible
- Keep hands away from moving parts
- Work on a flat, stable surface
Do not operate the mower with damaged cables or exposed drive components.
Visual Guidance
Please refer to the accompanying video for a visual demonstration of the cable adjustment procedure.
Understanding the Self-Propel System
The self-propel system works through several connected components:
- Self-propel drive cable
- Drive belt
- Gearbox and drive mechanism
If any of these components are worn, damaged, or incorrectly adjusted, the self-propel function may fail.
This guide focuses specifically on cable tension.
Checking the Self-Propel Cable
The self-propel cable runs from the handle lever down to the gearbox on the mower deck.
Step 1 – Inspect the Cable
- Locate the self-propel cable along the handle
- Check how much free movement (slack) is present
- Operate the self-propel lever and observe cable movement

Expected Tension
- 5–10 mm of free play = Normal
- More than 10 mm of free play = Likely too loose
- Very tight / no movement = Over-tensioned
If the cable is outside this range, adjustment is required.
Adjusting the Cable Tension
Step 1 – Locate the Barrel Adjuster
- Find the silver barrel adjuster along the cable
- This is usually positioned midway down the cable route

Step 2 – Loosen the Locking Nut
- Use the correct spanner (typically 8–12 mm depending on model)
- Loosen the locking nut at the top of the adjuster

Step 3 – Adjust the Cable
- Turn the barrel adjuster to reduce slack
- Adjust gradually in small increments
- Check lever movement as you adjust
Aim for 5–10 mm of free play in the lever.
Step 4 – Secure the Adjustment
- Tighten the locking nut against the barrel adjuster
- Ensure the adjustment does not move when tightened
Step 5 – Test the Self-Propel System
- Operate the self-propel lever
- Check that the mower drives smoothly
- Ensure engagement is immediate and consistent
Additional Causes of Self-Propel Failure
If correct cable tension does not restore operation, check the following:
Drive Belt Issues
- Loose belt
- Worn belt
- Broken belt
- Belt slipped off pulley
Gearbox Problems
- Worn internal gears
- Seized drive mechanism
- Damaged drive pulley
Cable Damage
Inspect the cable for:
- Fraying
- Kinks or bends
- Rust or corrosion
- Broken inner cable
If any damage is found, the cable must be replaced.
Frequently Asked Questions
What is the correct self-propel cable tension?
Typically, the correct setting is 5–10 mm of free play at the control lever.
Why is my mower self-propel not engaging?
Common causes include:
- Loose cable tension
- Worn or broken drive belt
- Damaged gearbox components
- Stretched or frayed cable
Can I overtighten the self-propel cable?
Yes. Over-tightening can cause:
- Constant drive engagement
- Premature belt wear
- Increased strain on gearbox components
Do I need tools to adjust the cable?
Most models require a spanner (usually 8–12 mm) to loosen and tighten the locking nut on the barrel adjuster.
View ArticleHow do I make sure that my drive belt is correctly tensioned on my Petrol Lawnmower
Quick Answer
If your self-propel system is not working correctly, the drive belt may be loose, worn, or not correctly tensioned. The belt should sit firmly on the pulleys with slight flexibility, and the gearbox tension spring must be correctly attached to maintain correct tension.
⚠️ Safety Notice
Before inspecting the drive belt:
- Switch off the mower and allow all moving parts to stop
- Remove the spark plug cap where possible
- Ensure the mower is on a stable, flat surface
- Keep hands clear of blades and pulley areas
Do not operate the mower with a damaged or loose drive system.
Understanding the Drive Belt System
The drive belt transfers power from the engine to the gearbox, enabling the self-propel function.
The system relies on:
- Drive belt
- Gearbox pulley
- Gearbox tension spring
The tension spring maintains correct belt tension. If it becomes loose or detached, the belt may slip or stop driving the mower.
Checking the Drive Belt
Tools Required
- No tools required for basic inspection
- Pliers may be required if the tension spring needs reattaching
Step 1 – Locate the Drive Belt
The drive belt runs between:
- Blade adaptor under the mower deck
- Gearbox pulley on top of the gearbox assembly

Step 2 – Check Belt Tension
With the engine off:
- Press the belt gently sideways
- A small amount of movement is normal
- The belt should remain seated on both pulleys
If the belt moves excessively or feels loose, tension may be incorrect.
Step 3 – Inspect Belt Condition
Check the full visible belt for signs of wear:
- Cracks
- Fraying
- Splitting
- Glazing or polishing
- Excessive wear
If any damage is present, the belt should be replaced.
Checking the Gearbox Tension Spring
The gearbox tension spring keeps the belt under correct tension during operation.

Step 1 – Inspect the Spring
Ensure the spring is:
- Securely attached at both ends
- Not stretched or distorted
- Free from damage or corrosion
- Not obstructed by debris
If the Spring Is Detached

If the spring has come loose:
- The belt may slip off the pulley
- The self-propel system may fail to engage
Reattach the spring securely before use.
If the spring is missing or damaged, it must be replaced.
Common Faults
Belt Has Slipped Off the Pulley
This may be caused by:
- Detached or loose tension spring
- Worn or stretched belt
- Incorrect installation
Belt Is Damaged
A worn belt may:
- Slip under load
- Reduce drive performance
- Stop the self-propel system working completely
Replacement is recommended.
Spring Is Missing or Broken
Without the tension spring:
- The belt cannot maintain correct tension
- The self-propel system will not function properly
Frequently Asked Questions
How tight should the drive belt be?
The belt should be firm on the pulleys but still have slight flexibility when pressed. It should not feel loose or overly tight.
What happens if the drive belt is loose?
A loose belt may:
- Slip under load
- Reduce or stop self-propel function
- Cause poor drive performance
Can I reuse a worn drive belt?
No. If the belt shows cracks, fraying, or glazing, it should be replaced.
Why does my belt keep coming off?
Common causes include:
- Missing or detached tension spring
- Worn belt
- Misaligned pulleys
Do I need tools to check the belt?
Basic inspection can be done without tools, but pliers may be required if the tension spring needs reattaching.
How do I connect my self propel cable to the gear box on my Petrol Lawnmower
Quick Answer
If your self-propel system is not working, the cable may be detached from the gearbox actuation lever. To fix this, you need to reconnect the cable end (spring hook) to the gearbox lever and ensure the outer cable is correctly seated in its housing. If the hook is broken, the cable will need replacing.
⚠️ Safety Notice
Before carrying out any inspection or repair:
- Switch off the mower and allow all moving parts to stop
- Remove the spark plug cap where possible
- Ensure the mower is stable on a flat surface
- Wear gloves when working near the gearbox and axle
Do not operate the mower if the cable is damaged or disconnected.
Understanding the Fault
The self-propel cable links:
- The drive lever on the handle
- The gearbox actuation lever at the base of the mower
If this connection fails, the self-propel system will not engage.
Common issues include:
- Cable has come loose from gearbox
- Spring hook at cable end has broken
- Cable has stretched or snapped
- Outer cable has slipped from its seating point
Inspecting the Cable
Step 1 – Check for Cable Slack
- Operate the self-propel lever
- Observe the cable movement along the handle and chassis
- If the cable remains loose or does not tighten, it may be disconnected or damaged
Step 2 – Inspect the Gearbox Connection
Locate the lower end of the cable at the gearbox.
Check for:
- Detached cable end
- Broken or bent spring hook
- Frayed or damaged inner cable
- Cable not seated in its guide
If the spring hook has failed, the cable must be replaced.
Replacing the Self-Propel Cable
⚠️ This procedure involves partial disassembly of the mower and should only be attempted if you are confident with mechanical repairs.
Step 1 – Remove the Wheels
- Remove the wheels required to access the axle assembly
- Keep all washers and retainers safely
Step 2 – Remove Axle Retainers
- Remove clips, springs, or brackets securing the axle
- Carefully note their positions for reassembly
Step 3 – Disconnect Cable from Gearbox
- Detach the cable end from the gearbox actuation lever
- Feed the cable back through the chassis grommet
Step 4 – Disconnect Cable from Handle
- Unhook the cable from the self-propel lever at the handle
- Remove cable fully from mower
Step 5 – Install Replacement Cable
Route the new cable through the same path as the original:
- Feed through chassis guides and grommets
- Attach inner cable hook to gearbox actuation lever
- Seat outer cable correctly in its housing point
Ensure the cable is not twisted or trapped.
Step 6 – Reassemble the Mower
Reinstall:
- Axle retainers and brackets
- Wheels
- Any covers or guards removed
After assembly:
- Operate self-propel lever
- Check smooth cable movement
- Confirm gearbox engagement works correctly
Important Information
- Many models use a combined self-propel and brake cable assembly
- Always ensure you order the correct cable for your specific model
- Incorrect routing can prevent the drive system from working properly
Guiding Photos
 *Green ring is where the outer-cable needs to be situated, and the blue ring is where the hook at the end of the cable needs to be attached (the 'actuation lever'. The black spring here is the 'Gearbox tension spring' which hooks from the gearbox to the chassis/framework.*

*Corresponding blue & green circles for inner and outer cables*
Frequently Asked Questions
Why has my self-propel cable come off the gearbox?
Common reasons include:
- Cable stretch over time
- Vibration loosening the hook
- Worn or damaged gearbox lever
- Impact damage during use or maintenance
Can I just reattach a broken cable hook?
No. If the spring hook is damaged or deformed, the cable should be replaced for safety and reliability.
Why does my cable keep coming loose?
This may be caused by:
- Incorrect routing through chassis guides
- Missing retaining clips
- Excessive cable tension or wear
Do I need to remove the wheels to replace the cable?
Yes, on most models wheel and axle removal is required to access the gearbox connection point.
My Petrol Lawnmower has a fault with the gear box
If your petrol lawnmower's self-propelled drive has stopped working and you've already confirmed the drive cable and drive belt are correctly fitted and in good condition, the gearbox assembly may have failed.
Common gearbox faults include worn internal gears, damaged bearings, seized components, worn drive shafts, or damaged gearbox pulleys. Replacing the gearbox can restore the self-propel function.
Quick Answer
If your petrol lawnmower's self-propel system is not working but the drive cable and drive belt are both in good condition, the gearbox is likely to be faulty.
Typical signs of a faulty gearbox include:
- Self-propel drive does not engage.
- Grinding or clicking noises from the drive system.
- Rear wheels do not rotate when the drive lever is operated.
- Gearbox feels seized or difficult to turn by hand.
- Visible damage or excessive wear to gearbox components.
Replacing the gearbox is an advanced repair that requires mechanical experience and specialist tools.
Before You Begin
⚠️ Important: Gearbox replacement is considered an advanced repair. Only attempt this repair if you are confident working on petrol garden machinery.
Before starting:
- Switch off the engine and allow it to cool completely.
- Remove the spark plug cap to prevent accidental starting.
- Drain all petrol and engine oil before tipping the mower.
- Work on a clean, stable surface.
- Wear suitable personal protective equipment (PPE), including gloves and eye protection.
- Have replacement circlips available if the originals become damaged during removal.
Recommended tools:
- 13 mm socket or spanner
- Screwdriver
- Circlip pliers
- Long-nose pliers
- Spring puller or suitable hook tool
Steps
Step 1 – Drain the Engine
Drain all fuel and engine oil from the mower.
Remove the air filter assembly if required to improve access.
Step 2 – Position the Mower
Carefully place the mower onto its side or upside down.
Only do this once all fuel and oil have been drained to prevent leaks and engine damage.
Step 3 – Remove the Wheel Covers
Using a suitable screwdriver, remove the plastic wheel covers from both rear wheels.
Step 4 – Remove the Axle Retaining Springs
Detach the retaining springs from both sides of the rear axle assembly.

Step 5 – Remove the Rear Wheels
Using a 13 mm socket or spanner:
- Remove both wheel retaining nuts.
- Slide each wheel from the axle.
Step 6 – Remove the Drive Gear Components
Using circlip pliers:
- Remove the retaining circlip.
- Remove the drive gear.
- Remove the drive pin.
- Remove any plastic wheel guards fitted to the axle.
Keep all components together for reassembly.

Step 7 – Remove the Gearbox Spring
Carefully remove the gearbox tension spring using pliers or a spring puller.
⚠️ The spring is under tension and may release suddenly if not handled carefully.
Step 8 – Remove the Drive Belt
Remove the drive belt from the gearbox pulley.
Carefully work the belt off the pulley without damaging it if it is being reused.
Step 9 – Remove the Gearbox Assembly
Lift the gearbox and axle assembly from the mower chassis.
Disconnect the drive cable by:
- Compressing the retaining clips with long-nose pliers.
- Pulling the cable free from the gearbox.
The gearbox assembly can now be removed from the mower.
Step 10 – Remove the Gearbox
Using circlip pliers:
- Remove the retaining circlips from both gearbox bushes.
- Remove the gearbox bushes.
- Slide the gearbox off the axle.
The faulty gearbox can now be discarded.

Step 11 – Install the Replacement Gearbox
Fit the new gearbox onto the axle.
Reassemble the mower by reversing the removal procedure.
Before completing the repair, ensure:
- All circlips are fully seated.
- The drive belt is correctly positioned.
- The gearbox spring is securely attached.
- The drive cable is correctly connected and adjusted.
- Rear wheels and retaining nuts are tightened securely.

Final Checks
Before using the mower:
- Refill with the correct SAE 30 engine oil (or as specified by the manufacturer).
- Refill with fresh unleaded petrol.
- Refit the air filter assembly if it was removed.
- Reconnect the spark plug cap.
- Start the engine.
- Test the self-propel drive in a safe, open area before normal operation.
Frequently Asked Questions
How do I know if my lawnmower gearbox is faulty?
If the self-propel system no longer drives the mower and both the drive belt and drive cable are in good condition, the gearbox is the most likely cause. Worn gears, seized bearings, or damaged shafts commonly cause gearbox failure.
Can I repair a lawnmower gearbox?
Most gearbox assemblies are supplied as sealed units and are replaced rather than repaired. Replacing the complete gearbox is usually the quickest and most reliable solution.
Why has my self-propelled lawnmower stopped driving?
The most common causes are:
- A broken or stretched drive belt.
- A damaged drive cable.
- A worn drive gear.
- A seized or worn gearbox.
- Damaged rear wheel drive mechanisms.
Checking these components in order will help identify the fault.
Can I use the mower if the gearbox has failed?
Yes. On most self-propelled petrol lawnmowers, the mower can still be used by pushing it manually. However, the self-propel function will not operate until the faulty gearbox has been replaced.
Do I need to drain the fuel and oil before replacing the gearbox?
Yes. Always drain the petrol and engine oil before tipping the mower onto its side or upside down. This helps prevent fuel spills, oil leaks, and possible engine damage.
My Petrol Lawnmower is hunting
If your petrol lawnmower engine repeatedly speeds up and slows down while running, this is known as engine hunting. Hunting is usually caused by an incorrect air-to-fuel mixture, often due to stale fuel, a blocked air filter, restricted fuel flow, or a dirty carburettor.
This guide explains the most common causes of engine hunting and the checks you can carry out to restore normal engine performance.
Quick Answer
A petrol lawnmower that is hunting is usually receiving too much air or not enough fuel, resulting in a lean air-to-fuel mixture.
The most common causes are:
- Old or stale petrol
- Dirty or blocked air filter
- Restricted fuel flow
- Blocked carburettor jets
- Air leaks in the intake system
In many cases, replacing old fuel and cleaning or replacing the air filter will resolve the problem.
Before You Begin
Before carrying out any inspection or maintenance:
- Switch off the engine and allow it to cool completely.
- Remove the spark plug cap to prevent accidental starting.
- Work in a well-ventilated area away from naked flames or ignition sources.
- Wear suitable personal protective equipment (PPE), including gloves and eye protection.
- Keep petrol in an approved fuel container and dispose of old fuel responsibly.
Tip: Before investigating a fault, consider the mowing conditions. Very long, thick or wet grass can place excessive load on the engine and may affect performance.
To reduce engine load:
- Cut long grass in stages.
- Avoid mowing wet grass where possible.
- Raise the cutting height when tackling dense vegetation.
Steps
Step 1 – Check the Fuel
Old petrol is one of the most common causes of engine hunting.
Ensure the mower contains:
- Fresh unleaded petrol.
- Fuel that is no more than 30 days old.
If the fuel is older than 30 days, drain the tank and refill with fresh petrol.
Step 2 – Replace Old Fuel
If stale fuel is suspected:
- Remove the air filter cover by unclipping it or removing the retaining screw, depending on your mower model.
- Remove the air filter.
- Remove the fuel cap and carefully drain the old petrol into a suitable approved container.
- Dispose of old fuel in accordance with local regulations.
- Refit the air filter and air filter cover.
- Fill the fuel tank with fresh unleaded petrol.
Start the engine and check whether the hunting has stopped.
Step 3 – Inspect the Air Filter
A blocked air filter restricts airflow and can upset the air-to-fuel ratio, causing unstable engine speed.
Remove the air filter cover and inspect the filter.
Sponge Air Filter
A clean sponge filter is typically yellow or grey.
To clean it:
- Wash in warm soapy water.
- Rinse thoroughly.
- Allow it to dry completely.
- Reinstall once fully dry.
Do not reinstall a wet sponge filter.
Paper Air Filter
A clean paper filter is normally white or off-white.
Paper filters should not be washed.
Replace the filter if it is:
- Dirty
- Damaged
- Oil-soaked
A clean air filter helps maintain the correct air-to-fuel mixture and improves engine performance.
Frequently Asked Questions
What causes a petrol lawnmower engine to hunt?
Engine hunting is usually caused by a lean air-to-fuel mixture. Common causes include stale fuel, a dirty air filter, restricted fuel flow, blocked carburettor jets or an air leak in the intake system.
Will old petrol make my lawnmower hunt?
Yes. Petrol begins to deteriorate after around 30 days. Old fuel burns less efficiently and can cause unstable engine speed, poor starting and engine hunting.
Can a dirty air filter cause engine hunting?
Yes. A clogged air filter can disrupt the correct air-to-fuel ratio, causing the engine speed to fluctuate.
Can I clean my lawnmower air filter?
Sponge air filters can usually be washed and reused once fully dry. Paper air filters should be replaced if they are dirty, damaged or contaminated with oil.
What if my lawnmower is still hunting after replacing the fuel and air filter?
If the problem persists, the carburettor may require cleaning, the fuel system may be restricted, or there may be an air leak. Further inspection or servicing may be required.
My Petrol Lawnmower is blowing black smoke
If your petrol lawnmower is blowing black smoke from the exhaust, the engine is usually running with too much fuel and not enough air. This is known as a rich fuel mixture and is most commonly caused by a dirty or blocked air filter restricting airflow to the engine.
This guide explains how to inspect, clean, or replace the air filter to help restore normal engine performance.
Quick Answer
A petrol lawnmower that is blowing black smoke is usually suffering from a rich air-to-fuel mixture.
The most common cause is a dirty or blocked air filter, although other causes can include:
- Overfilled engine oil
- A sticking choke that remains engaged
- A carburettor fault allowing too much fuel into the engine
- Incorrect carburettor adjustment (where applicable)
Start by inspecting the air filter, as this is the quickest and most common solution.
Before You Begin
Before carrying out any maintenance:
- Switch off the engine and allow it to cool completely.
- Remove the spark plug cap to prevent accidental starting.
- Work in a clean, well-ventilated area.
- Wear suitable personal protective equipment (PPE), including gloves and eye protection.
Locate the air filter housing on the side of the engine. Depending on your mower model, the cover may be secured by a clip or a retaining screw.
Steps
Step 1 – Remove the Air Filter Cover
Locate the air filter cover on the side of the engine.
Depending on your mower model:
- Unclip the cover, or
- Remove the retaining screw.
Carefully remove the cover and take out the air filter.
Identify whether your mower uses a sponge air filter or a paper air filter.
Step 2 – Inspect the Air Filter
Examine the filter for signs of:
- Dirt and dust build-up
- Grass clippings or debris
- Oil contamination
- Tears or other damage
A dirty or damaged air filter restricts airflow, causing the engine to run rich and produce black exhaust smoke.
Step 3 – Clean a Sponge Air Filter
A clean sponge air filter is usually yellow or grey.
To clean the filter:
- Wash it in warm soapy water.
- Rinse thoroughly with clean water.
- Allow it to air dry completely.
- Reinstall the dry filter.
- Refit the air filter cover securely.
Important: Never reinstall a wet sponge filter, as this can reduce engine performance and cause running issues.
Step 4 – Replace a Paper Air Filter
Paper air filters cannot be cleaned effectively.
Replace the filter if it is:
- Dirty
- Oil-soaked
- Torn or damaged
- Heavily discoloured
Fit a new replacement filter and securely refit the air filter cover.
Step 5 – Test the Engine
Reconnect the spark plug cap and start the engine.
If the black smoke has stopped, the air filter was likely restricting airflow.
If black smoke continues after replacing the air filter, further inspection of the choke, carburettor or engine oil level may be required.
Frequently Asked Questions
Why is my petrol lawnmower blowing black smoke?
Black smoke usually means the engine is running with too much fuel and not enough air. The most common cause is a dirty or blocked air filter restricting airflow.
Can a dirty air filter cause black smoke?
Yes. A blocked air filter reduces the amount of air entering the engine, creating a rich fuel mixture that produces black exhaust smoke.
Can I clean my lawnmower air filter?
Sponge air filters can usually be washed, dried completely and reused. Paper air filters should be replaced if they are dirty, damaged or contaminated with oil.
What if my lawnmower still blows black smoke after replacing the air filter?
If replacing the air filter does not resolve the problem, check that:
- The choke has fully disengaged after starting.
- The engine oil has not been overfilled.
- The carburettor is operating correctly and is not supplying excessive fuel.
Further servicing may be required if the fault persists.
Is it safe to use a lawnmower that is blowing black smoke?
It is not recommended. Running the engine with a rich fuel mixture can increase fuel consumption, reduce performance, foul the spark plug and may eventually damage engine components if left unresolved.
View ArticleMy Petrol Lawnmower is blowing white/grey/blue smoke
If your petrol lawnmower is producing white, grey or blue smoke from the exhaust, it is usually caused by engine oil entering areas where it should not normally be present. In many cases, the issue is temporary and can be resolved with a few simple checks.
This guide explains the most common causes of white, grey or blue exhaust smoke and the steps you can take to identify and resolve the problem.
Quick Answer
White, grey or blue smoke from a petrol lawnmower is most commonly caused by engine oil burning inside the engine or exhaust system.
Common causes include:
- The engine oil has been overfilled.
- The lawnmower has been tilted onto its side, allowing oil to enter the cylinder, exhaust or air filter housing.
- Oil has been spilled onto the engine during maintenance.
- The air filter has become contaminated with engine oil.
If the mower has recently been tipped over and the oil level is correct, the smoke will often disappear after a few minutes of normal operation.
Before You Begin
Before carrying out any inspection or maintenance:
- Switch off the engine and allow it to cool completely.
- Remove the spark plug cap to prevent accidental starting.
- Work in a well-ventilated outdoor area.
- Wear suitable personal protective equipment (PPE), including gloves and eye protection.
Allow the engine to cool before checking the oil level or removing the air filter.
Steps
Step 1 – Check the Engine Oil Level
Remove the oil filler cap and dipstick.
Check that the engine oil level is between the minimum and maximum marks on the dipstick.
Most petrol lawnmowers require SAE 30 engine oil, or the oil specified in your user manual.
If the oil level is above the maximum mark, remove the excess oil before operating the mower.
Overfilled engine oil can be forced into the combustion chamber or air intake, causing white, grey or blue smoke.
Step 2 – Check Whether the Lawnmower Has Been Tilted
Consider whether the mower has recently been tipped onto its side.
This commonly happens when:
- Cleaning underneath the mower deck.
- Transporting the mower.
- Carrying out maintenance.
Tilting the mower incorrectly can allow engine oil to enter the exhaust, cylinder or air filter housing, causing temporary smoke when the engine is restarted.
Step 3 – Allow Excess Oil to Burn Off
If the oil level is correct and the mower has recently been tilted:
- Start the engine in a safe, well-ventilated outdoor area.
- Allow the engine to idle and run normally.
- Monitor the exhaust.
As the excess oil burns away, the amount of smoke should gradually reduce before stopping completely.
Depending on how much oil has entered the engine or exhaust, this process may take several minutes.
Step 4 – Inspect the Air Filter
Oil contamination can affect the air filter if the mower has been tipped over.
Remove the air filter cover and inspect the filter.
Sponge Air Filter
A clean sponge filter is typically yellow or grey.
To clean the filter:
- Remove the filter.
- Wash it in warm soapy water.
- Rinse thoroughly.
- Allow it to dry completely.
- Reinstall the filter and refit the cover.
Do not reinstall a wet sponge filter.
Paper Air Filter
A clean paper filter is normally white or off-white.
Paper air filters cannot be cleaned effectively.
Replace the filter if it is:
- Dirty.
- Damaged.
- Oil-soaked.
- Heavily discoloured.
Fit a new air filter and securely refit the cover.
Step 5 – Test the Engine
Reconnect the spark plug cap and start the engine.
If the smoke gradually disappears, the issue was most likely caused by excess oil entering the engine or exhaust.
If the smoke continues after checking the oil level and air filter, further diagnosis may be required.
Frequently Asked Questions
Why is my petrol lawnmower blowing white, grey or blue smoke?
White, grey or blue smoke is usually caused by engine oil burning inside the engine or exhaust. This commonly happens if the mower has been tilted incorrectly or the engine oil has been overfilled.
Will white smoke stop on its own?
Yes. If the mower has recently been tipped over and the oil level is correct, the smoke will usually disappear after the excess oil has burned away during normal operation.
Can too much engine oil cause smoke?
Yes. Overfilling the engine can force oil into the combustion chamber or air intake, producing white, grey or blue exhaust smoke.
Can a dirty air filter cause white or blue smoke?
A dirty air filter alone is unlikely to cause white or blue smoke. However, an air filter contaminated with engine oil after the mower has been tilted can contribute to the problem.
Is it safe to continue using a lawnmower that is smoking?
If the smoke is caused by excess oil after tipping the mower, it will usually clear after a short period. If the smoke continues, the oil level is correct and the mower has not been tilted, stop using the machine and investigate further, as continued smoking may indicate a more serious engine fault.
My Petrol Lawnmowers pull cord will not pull out of the starter assembly
If the pull cord on your petrol lawnmower is stuck or will not pull out of the recoil starter, it is usually caused by engine compression, a mechanical obstruction, an engine brake issue or a fault within the recoil starter assembly.
This guide explains the most common causes and the steps you can take to free the pull cord and identify the source of the problem.
Quick Answer
If your petrol lawnmower pull cord will not pull out, the most common causes are:
- The engine has stopped on the compression stroke.
- The engine oil level is too high or too low.
- Grass or debris is preventing the blade from turning.
- The engine brake cable is not fully disengaging.
- The self-propel drive belt has slipped or become damaged.
- The recoil starter assembly has failed.
Start by removing the spark plug and checking whether the engine can be turned over by hand.
Before You Begin
Before carrying out any inspection or maintenance:
- Switch off the engine and allow it to cool completely.
- Remove the spark plug cap to prevent accidental starting.
- Wear suitable personal protective equipment (PPE), including gloves and eye protection.
- Work on a clean, level surface.
- If inspecting underneath the mower, ensure the spark plug cap remains disconnected.
Tools you may need:
- Spark plug spanner or socket

- Protective gloves
- Clean cloth
Steps
Step 1 – Release Engine Compression
Sometimes the engine stops on the compression stroke, making the pull cord difficult or impossible to pull.
- Remove the spark plug cap.
- Remove the spark plug using a suitable spark plug spanner.
- Hold the engine brake lever against the handle.
- Wearing protective gloves, carefully rotate the blade by hand four or five complete turns.
- Refit the spark plug by hand before tightening with the spark plug spanner.
- Reconnect the spark plug cap.
Test the pull cord again. It should now pull more freely.
Step 2 – Check the Engine Oil Level
An incorrect oil level can affect engine movement.
Check the oil level using the dipstick.
If the oil level is low:
- Top up with the recommended engine oil, usually SAE 30 or the oil specified in your owner's manual.
- Ensure the oil level is between the minimum and maximum marks.
If the engine oil has been overfilled:
- Remove the spark plug.
- Pull the starter cord several times to help expel excess oil from the cylinder.
- Clean or replace the spark plug if necessary.
- Refit the spark plug and reconnect the spark plug cap.
Step 3 – Check for Obstructions Under the Mower
Grass, twigs and other debris can prevent the blade from rotating, which also prevents the engine from turning.
Inspect the underside of the mower for:
- Thick grass build-up
- Twigs or branches
- Stones or other debris lodged around the blade
Remove any obstructions before attempting to start the mower.
Always ensure the spark plug cap has been removed before working underneath the mower.
Step 4 – Check the Engine Brake Cable
If the engine brake cable is too loose or incorrectly adjusted, the brake may remain partially engaged.
This can make the pull cord difficult to operate.
Inspect the cable for:
- Excessive slack
- Damage
- Incorrect adjustment
Adjust the cable according to your mower's user manual if required.
Step 5 – Inspect the Self-Propel Drive Belt
On self-propelled models, a damaged or displaced drive belt may create additional resistance.
Check that the drive belt:
- Is correctly seated on the pulleys.
- Is not damaged or excessively worn.
- Has not slipped from the drive system.
Refit or replace the drive belt if necessary.
Step 6 – Inspect the Recoil Starter
If the engine turns freely but the pull cord is still stuck, the recoil starter assembly may be faulty.
Possible faults include:
- A broken recoil spring.
- A jammed starter pulley.
- A damaged starter rope.
- Worn or broken starter pawls.
The recoil starter assembly may require repair or replacement.
Frequently Asked Questions
Why won't my lawnmower pull cord pull out?
The pull cord may be stuck because the engine has stopped on the compression stroke, the blade is obstructed, the engine brake is engaged or the recoil starter assembly has failed.
Can too much oil stop the pull cord from moving?
Yes. Overfilling the engine or tipping the mower can allow oil to enter the cylinder, creating hydraulic lock that prevents the engine from turning.
Why should I remove the spark plug first?
Removing the spark plug eliminates engine compression, making it much easier to determine whether the engine or the recoil starter is causing the problem.
Can grass underneath the mower stop the pull cord?
Yes. Thick grass, sticks or other debris wrapped around the blade can prevent the engine from rotating, making the pull cord difficult or impossible to pull.
What if the pull cord is still stuck after completing these checks?
If the engine turns freely with the spark plug removed but the pull cord remains stuck, the recoil starter assembly is likely to be damaged and may need to be repaired or replaced.
How do I check that the start-stop cable is tensioned correctly on my Petrol Lawnmower
The start-stop cable, also known as the engine brake cable, plays an important role in the safe operation of your petrol lawnmower. If the cable is too loose or too tight, the engine may fail to start, stop incorrectly, or the control lever may feel unresponsive.
This guide explains how to check and adjust the start-stop cable tension on your petrol lawnmower.
Quick Answer
If your petrol lawnmower will not start, does not stop correctly, or the start-stop lever feels loose, the engine brake cable may require adjustment.
A correctly adjusted cable should have approximately 5–10 mm of free play. If there is excessive slack, use the barrel adjuster on the cable to increase tension until the correct amount of movement is achieved.
Before You Begin
Before inspecting or adjusting the cable:
- Switch off the engine and allow it to cool completely.
- Remove the spark plug cap to prevent accidental starting.
- Place the lawnmower on a stable, level surface.
- Wear suitable personal protective equipment (PPE), including gloves.
Depending on your mower model, you may require:
- 8 mm and 10 mm spanners, or
- 10 mm and 12 mm spanners
Steps
Step 1 – Check the Cable for Excessive Slack
Inspect the start-stop cable and check the amount of free movement.
The cable should typically have approximately 5–10 mm of free play.
Signs that adjustment may be required include:
- Excessive slack in the cable.
- The control lever feels loose or unresponsive.
- The engine will not start when the lever is held.
- The engine does not stop correctly when the lever is released.
If the cable has more than 5–10 mm of free movement, adjustment is recommended.

Step 2 – Locate the Cable Adjuster
Locate the silver barrel adjuster positioned along the cable.
This adjuster is normally found approximately halfway down the cable and is used to increase or decrease cable tension.

Step 3 – Loosen the Locking Nut
Using the appropriate spanner:
- Hold the barrel adjuster in position.
- Loosen the locking nut.
- Do not remove the locking nut completely.
This will allow the adjuster to be turned.
Step 4 – Adjust the Cable Tension

Turn the barrel adjuster to reduce the amount of cable slack.
Make small adjustments and check the cable movement regularly.
Continue adjusting until the cable has approximately 5–10 mm of free play.
Avoid overtightening the cable, as this can prevent the engine brake from operating correctly.
Step 5 – Secure the Adjustment
Once the correct tension has been achieved:
- Hold the barrel adjuster in position.
- Tighten the locking nut securely.
- Ensure the adjuster cannot move once tightened.
Step 6 – Test the Operation
After adjustment:
- Pull the start-stop lever and check that it moves smoothly.
- Release the lever and confirm it returns fully.
- Check that the cable moves freely without binding.
- Reconnect the spark plug cap.
- Start the mower and confirm normal operation.
Frequently Asked Questions
What does the start-stop cable do on a petrol lawnmower?
The start-stop cable connects the control lever on the handle to the engine brake mechanism. Holding the lever disengages the engine brake and allows the engine to run. Releasing the lever applies the brake and stops the engine.
How much free play should the cable have?
Most petrol lawnmowers require approximately 5–10 mm of free movement in the cable. Refer to your user manual if a specific adjustment is recommended for your model.
Can a loose start-stop cable prevent the engine from starting?
Yes. If the cable is too loose, the engine brake may not fully disengage when the control lever is pulled, preventing the engine from starting.
Can an overtightened cable cause problems?
Yes. A cable that is too tight may prevent the engine brake from operating correctly and could stop the engine from shutting down when the control lever is released.
How often should I check the cable adjustment?
It is good practice to inspect the cable at the start of each mowing season and whenever you notice starting issues, poor lever operation or excessive slack.
View ArticleMy Petrol Lawnmower is experiencing excessive vibrations
If your petrol lawnmower vibrates excessively during use, the problem is usually caused by damage to the cutting system following an impact with a solid object. In many cases, the blade, blade adaptor or crankshaft may have been damaged after striking a tree root, stone or other obstacle.
This guide explains the most common causes of excessive vibration and the checks you can carry out to identify the fault.
Quick Answer
Excessive vibration on a petrol lawnmower is most commonly caused by impact damage after the blade has struck a hard object.
The most common causes are:
- A damaged blade adaptor.
- A bent or damaged mower blade.
- A bent crankshaft.
- Loose blade fixings.
Stop using the mower as soon as excessive vibration is noticed, as continued operation can cause further damage to the engine and cutting system.
Before You Begin
Before inspecting the mower:
- Switch off the engine and allow it to cool completely.
- Remove the spark plug cap to prevent accidental starting.
- Empty the fuel tank or follow the manufacturer's guidance before tilting the mower.
- Wear suitable personal protective equipment (PPE), including gloves.
- Ensure the mower is positioned securely before working underneath it.
Never inspect or handle the blade while the spark plug cap is connected.
Steps
Step 1 – Consider Recent Blade Impacts
Think about whether the mower has recently struck a solid object such as:
- Tree roots.
- Stones or rubble.
- Drain covers.
- Paving slabs.
- Uneven ground.
A sudden impact can transfer force through the cutting system, damaging components and causing excessive vibration.
Step 2 – Inspect the Blade Adaptor
The blade adaptor is designed to absorb impact and help protect the engine from damage.
Inspect the adaptor for:
- Cracks.
- Chips.
- Missing shear pins.
- Distortion or deformation.
If any damage is found, replace the blade adaptor before using the mower again.
Using a damaged adaptor can lead to additional mechanical damage and unsafe operation.
Step 3 – Inspect the Mower Blade
Carefully examine the blade for signs of damage.
Look for:
- Bent or twisted sections.
- Cracks or splits.
- Dents.
- Uneven wear.
- A blade that appears out of shape when rotated by hand.
If the blade is damaged, replace it immediately.
Do not attempt to straighten, weld or repair a damaged mower blade.
Step 4 – Check for Loose Blade Fixings
Inspect the blade retaining bolt and any associated fixings.
Ensure:
- The blade is securely fastened.
- There is no movement between the blade and blade adaptor.
- The retaining bolt is tightened to the manufacturer's specification.
A loose blade can also cause excessive vibration and should be corrected before operating the mower.
Step 5 – Check for a Bent Crankshaft
If both the blade and blade adaptor appear undamaged, inspect the crankshaft.
With the spark plug cap removed:
- Carefully rotate the blade by hand.
- Observe the movement of the blade and crankshaft.
- Look for any wobble or uneven rotation.
Signs of a bent crankshaft include:
- Severe vibration while mowing.
- The blade moving from side to side as it rotates.
- Uneven or off-centre rotation.
A bent crankshaft is usually the result of a severe blade impact.
Frequently Asked Questions
What causes excessive vibration on a petrol lawnmower?
The most common cause is impact damage after the blade strikes a solid object. This can damage the blade, blade adaptor or crankshaft.
Can I continue using my lawnmower if it is vibrating?
No. Excessive vibration usually indicates a mechanical fault. Continuing to use the mower can cause further damage and may create a safety risk.
How do I know if my mower blade is bent?
A bent blade may appear uneven when rotated by hand and often causes noticeable vibration while mowing. Cracks, dents or twists are also signs that the blade should be replaced.
What does a blade adaptor do?
The blade adaptor connects the blade to the engine and is designed to absorb impact during a blade strike, helping to protect the crankshaft from damage.
How can I tell if the crankshaft is bent?
With the spark plug cap removed, slowly rotate the blade by hand. If the blade or shaft wobbles instead of rotating smoothly, the crankshaft may be bent.
Can a bent crankshaft be repaired?
A bent crankshaft is a major engine fault. Depending on the mower model and the extent of the damage, replacing the engine is often more practical and cost-effective than repairing the crankshaft.
How do I check the height adjustment is working on my Petrol Lawnmower
If your petrol lawnmower will not adjust its cutting height or the height adjustment lever does not lock into position, there may be a problem with the adjustment mechanism. This could be caused by a disconnected linkage, damaged spring or worn adjustment components.
This guide explains how the height adjustment system works and the checks you can carry out to ensure it is operating correctly.
Quick Answer
If the height adjustment on your petrol lawnmower is not working correctly, check the following:
- The height adjustment lever moves freely through its full range.
- The lever locks securely into each height position.
- The height adjustment spring is fitted and providing tension.
- The connecting rod is securely attached and undamaged.
- The front and rear axle linkages move together when the lever is operated.
Most height adjustment issues are caused by a disconnected linkage, damaged spring or worn adjustment mechanism.
Before You Begin
Before inspecting the mower:
- Switch off the engine and allow it to cool completely.
- Remove the spark plug cap to prevent accidental starting.
- Place the mower on a level surface.
- Wear suitable personal protective equipment (PPE), including gloves.
- Remove any grass or debris from around the wheel assemblies and adjustment mechanism.
If the mower has recently been used, allow all moving parts to cool before carrying out any checks.
Steps
Step 1 – Check the Height Adjustment Lever
Operate the height adjustment lever through its full range of movement.
Check that the lever:
- Moves smoothly.
- Has consistent resistance throughout its travel.
- Does not stick or bind.
- Allows the wheels to move between cutting heights.
If the lever is difficult to move, inspect the mechanism for dirt, corrosion or damage.
Step 2 – Check the Lever Locking Mechanism
Move the lever into each cutting height position.
Ensure that it:
- Locks securely into each notch.
- Does not slip out of position.
- Remains firmly engaged during movement.
If the lever will not lock, inspect the locking mechanism and adjustment spring for damage or wear.
Step 3 – Inspect the Height Adjustment Spring
The height adjustment spring provides the tension required to keep the lever securely engaged.
Inspect the spring and check that it is:
- Present.
- Correctly fitted.
- Not stretched.
- Not broken.
- Not detached from its mounting points.
Replace the spring if it is damaged or missing.
Step 4 – Inspect the Connecting Rod
The connecting rod links the front and rear axle assemblies, allowing all wheels to adjust together.
Locate the connecting rod, typically fitted along one side of the mower deck between the front and rear axles.
Check that the rod:
- Is securely attached at both ends.
- Is straight and free from damage.
- Moves correctly when the height adjustment lever is operated.
A bent or disconnected rod can prevent the height adjustment system from operating correctly.
Step 5 – Inspect the Connection Points
Inspect the fixing points where the connecting rod attaches to the front and rear axle assemblies.
Depending on the mower model, check that:
- Cotter pins are fitted securely.
- Spring clips are present.
- Nuts and bolts are tight.
- There are no worn or damaged mounting points.
Replace or tighten any loose or missing fixings before operating the mower.
Step 6 – Test the Height Adjustment
After completing the inspection:
- Move the adjustment lever through every cutting height position.
- Confirm that all wheels move together.
- Check that each position locks securely.
- Ensure the mower sits level on all four wheels.
The height adjustment system should now operate smoothly and hold the selected cutting height.

Frequently Asked Questions
Why won't my lawnmower height adjustment work?
The most common causes are a damaged adjustment spring, disconnected connecting rod, worn locking mechanism or loose linkage components.
Why won't the height adjustment lever stay in position?
If the lever slips out of its selected height, the adjustment spring may be damaged, missing or no longer providing enough tension.
What does the connecting rod do?
The connecting rod links the front and rear axle assemblies so that all wheels move together when the height adjustment lever is operated.
Can grass stop the height adjustment from working?
Yes. Grass clippings, dirt and debris can build up around the adjustment mechanism and restrict its movement. Cleaning the mechanism may restore normal operation.
Should all four wheels move together?
Yes. On most petrol lawnmowers with a central height adjustment system, operating the adjustment lever changes the height of both the front and rear wheels simultaneously.
Can I use my lawnmower if the height adjustment is damaged?
It is not recommended. A damaged adjustment mechanism can prevent the mower from maintaining a consistent cutting height and may lead to uneven cutting or further mechanical damage.
View ArticleMy Petrol Lawnmower is leaking fuel from the primer bulb
If fuel is leaking from the primer bulb on your petrol lawnmower, it is usually caused by the carburettor float valve becoming stuck. This allows fuel to back up through the carburettor and escape from the primer bulb.
This guide explains how to carry out a simple bleed and tap procedure that may free the float valve and stop the fuel leak.
Quick Answer
If petrol is leaking from the primer bulb on a lawnmower fitted with an SV150 or SE475 engine, the carburettor float valve has most likely become stuck.
In many cases, you can resolve the problem by:
- Bleeding fuel from the carburettor float bowl.
- Tapping the float chamber to free the float valve.
- Restarting the engine and checking that the leak has stopped.
If the leak continues, the carburettor may require cleaning or repair.
Before You Begin
This guide only applies to models with SV150 engine or SE475 engine, please refer to instruction manual.
fitted with either:
- SV150 engine
- SE475 engine
Before carrying out any work:
- Switch off the engine and allow it to cool completely.
- Remove the spark plug cap to prevent accidental starting.
- Work in a well-ventilated outdoor area away from naked flames or sources of ignition.
- Wear suitable personal protective equipment (PPE), including gloves and eye protection.
- Keep a cloth or suitable container ready to catch any fuel released during the procedure.
Steps
Step 1 – Locate the Carburettor
Locate the carburettor on the side of the engine.
It is positioned between the engine and the air filter housing and is approximately the size of a fist.
Step 2 – Loosen the Float Bowl Nut
Locate the angled nut on the bottom of the carburettor float bowl.
Using a suitable spanner:
- Loosen the angled nut slightly.
- Do not remove it completely.
Fuel will begin to drain from the float bowl.
Step 3 – Bleed the Fuel
Allow fuel to drain from the loosened nut for approximately 20 to 30 seconds.
This helps flush the float chamber and may free a sticking float valve.
Once complete, tighten the nut securely.
Step 4 – Tap the Float Chamber
Using the handle of a screwdriver, a spanner or a similar non-sharp tool, tap the float chamber several times.
The light impacts help free the float valve if it has become stuck in the open position.
Avoid striking the carburettor excessively, as this may cause damage.
Step 5 – Test the Lawnmower
Reconnect the spark plug cap and start the engine.
Inspect the primer bulb while the engine is running.
If the float valve has returned to its correct position, fuel should no longer leak from the primer bulb.
If the leak persists, the carburettor may require cleaning, servicing or replacement.
Frequently Asked Questions
Why is fuel leaking from my primer bulb?
Fuel leaking from the primer bulb is usually caused by a float valve inside the carburettor sticking open. This allows excess fuel to flow back through the primer circuit.
What does the bleed and tap procedure do?
Bleeding the carburettor removes excess fuel from the float bowl, while gently tapping the float chamber can free a float valve that has become stuck.
Will this repair every fuel leak from the primer bulb?
No. If the float valve is worn, damaged or contaminated with debris, the carburettor may need to be dismantled, cleaned or replaced.
Can I continue using the mower if fuel is leaking?
No. Fuel leaks present a fire hazard and should always be repaired before operating the lawnmower.
Which lawnmowers does this guide apply to?
This procedure applies to petrol lawnmowers fitted with the SV150 or SE475 engine.
How do I remove the wheels on my Petrol Lawnmower
If you need to replace a wheel, inspect the drive mechanism or carry out maintenance, you may need to remove one or more wheels from your petrol lawnmower. The removal process varies depending on whether you are removing a front wheel or a rear drive wheel.
This guide explains how to safely remove the front and rear wheels from your petrol lawnmower.
Quick Answer
To remove a lawnmower wheel:
- Remove the wheel trim or hub cap.
- Undo the retaining nut and washer.
- Slide the wheel off the axle.
- Retain any bearings, drive cogs or dust covers for reassembly.
On self-propelled models, additional components such as a drive cog or circlip may also need to be removed.
Before You Begin
Before removing a wheel:
- Switch off the engine and allow it to cool completely.
- Remove the spark plug cap to prevent accidental starting.
- Place the mower on a stable, level surface.
- Wear suitable personal protective equipment (PPE), including gloves.
- Keep all fixings and components together to prevent them from being lost during reassembly.
If tilting the mower is necessary, follow the manufacturer's recommendations and ensure fuel and oil cannot leak.
Steps
Front Wheels
Step 1 – Remove the Wheel Trim
Using a flat-bladed screwdriver or a similar tool, carefully remove the wheel trim (hub cap).
If it is difficult to remove, work around the edge a little at a time until it releases.

Step 2 – Remove the Wheel Fixings
Once the hub cap has been removed:
- Remove the retaining nut (47).
- Remove the washer (48).
Use a suitable spanner or socket for your mower model.
Step 3 – Remove the Wheel
Carefully slide the wheel off the axle.
Take care not to lose the wheel bearings (49), which may remain on the axle or come away with the wheel.
Step 4 – Reassemble
Refit the wheel by reversing the removal procedure.
Ensure the bearings, washer and retaining nut are correctly positioned before tightening.
Rear Wheels (XSZ41D, XSZ51C and Similar Models)
Step 1 – Remove the Wheel Trim
Remove the hub cap using the same method described for the front wheels.

Step 2 – Remove the Wheel Fixings
Using a suitable spanner:
- Remove the retaining nut (47).
- Remove the washer (48).
Step 3 – Remove the Wheel
Slide the wheel from the axle.
Take care not to lose the following components:
- Bearings (49)
- Drive cog (58)
- Dust cover (51)
Step 4 – Remove the Drive Cog
Using circlip pliers or long-nose pliers:
- Remove the circlip (52).
- Lift the drive cog (58) from the axle.
Step 5 – Reassemble
Reassemble the wheel by reversing the removal procedure.
Before operating the mower, ensure:
- The drive cog is correctly seated.
- The circlip is securely fitted.
- The wheel rotates freely.
Rear Wheels (XSZ48A, XSZ53C and Similar Models)
Step 1 – Remove the Wheel Trim
Carefully remove the hub cap.

Step 2 – Remove the Wheel Fixings
Using a suitable spanner:
- Remove the retaining nut (30).
- Remove the washer (42).
Step 3 – Remove the Wheel
Slide the wheel from the axle.
Take care not to lose the wheel bearings (44).
Step 4 – Remove the Drive Cog Assembly
To remove the drive cog (46) and dust cover (48):
- Remove the three retaining screws (47).
- Lift the drive cog assembly from the wheel hub.
Step 5 – Reassemble
Reassemble the wheel in reverse order.
Ensure:
- All fixings are securely tightened.
- The drive cog is correctly positioned.
- The wheel rotates smoothly before using the mower.
Frequently Asked Questions
How do I remove a lawnmower wheel?
Most lawnmower wheels are secured by a hub cap, retaining nut and washer. Once these have been removed, the wheel can be slid from the axle. Self-propelled models may also include a drive cog or circlip.
Why won't my lawnmower wheel come off?
The wheel may be seized due to dirt, corrosion or a worn drive cog. Check that all retaining nuts, washers, circlips and drive components have been removed before attempting to remove the wheel.
Do I need special tools to remove a lawnmower wheel?
Most wheels can be removed using a spanner or socket. Self-propelled models may also require circlip pliers to remove the drive cog retaining clip.
Can I reuse the bearings and drive cog?
Yes, provided they are clean, undamaged and show no signs of excessive wear. Replace any worn or damaged components before reassembly.
How do I know if my wheel bearings need replacing?
Wheel bearings should be replaced if they feel rough when rotated, have excessive movement, show signs of corrosion or are visibly damaged.
View ArticleHow do I replace the blade on my Petrol Lawnmower
Replacing the blade on your petrol lawnmower helps maintain a clean cut and ensures the mower operates safely and efficiently. A worn, bent or damaged blade can reduce cutting performance, place additional strain on the engine and increase vibration.
This guide explains how to safely remove and replace the cutting blade on your petrol lawnmower.
Quick Answer
To replace the blade on a petrol lawnmower:
- Switch off the engine and remove the spark plug cap.
- Safely access the underside of the mower.
- Hold the blade securely and remove the blade bolt.
- Inspect the blade adaptor for damage.
- Fit the new blade, a new washer and tighten the blade bolt securely.
Always ensure the blade is installed in the correct orientation before operating the mower.
Before You Begin
Before replacing the blade:
- Switch off the engine and allow it to cool completely.
- Remove the spark plug cap to prevent accidental starting.
- Place the mower on a stable surface.
- Wear thick protective gloves when handling the blade.
- Use the correct replacement blade for your lawnmower model.
Tools and parts required:
- Thick protective gloves
- Socket wrench or socket set
- Replacement blade
- New blade washer (recommended)
To access the blade:
- Tilt the mower backwards by lowering the handles with assistance, or
- Drain the fuel and engine oil before carefully turning the mower upside down.
Only invert the mower if the fuel and oil have been drained or if this is recommended by the manufacturer.
Steps
Step 1 – Access the Blade
Position the mower so you can safely access the underside.
Ensure the mower is stable before beginning work.
Step 2 – Secure the Blade
Put on protective gloves and hold the blade firmly to prevent it from rotating.
If necessary, place a block of wood between the blade and the mower deck to stop the blade from turning while loosening the bolt.
Step 3 – Remove the Blade
Using a suitable socket wrench:
- Turn the blade bolt anti-clockwise to loosen it.
- Remove the blade bolt.
- Remove the blade washer.
- Lift the blade from the blade adaptor.
Keep the blade adaptor in position while removing the blade.
Step 4 – Inspect the Blade Adaptor
Before fitting the replacement blade, inspect the blade adaptor for:
- Cracks
- Excessive wear
- Damage
- Distortion
Replace the blade adaptor if any damage is found.
Step 5 – Fit the New Blade
Position the replacement blade onto the blade adaptor.
Ensure:
- The locating pins align correctly.
- The blade sits flat against the adaptor.
- The blade is installed in the correct orientation.
Incorrect blade installation can affect cutting performance and safety.
Step 6 – Install the Washer and Blade Bolt
Fit a new blade washer onto the blade bolt.
Insert the blade bolt and tighten it clockwise using the socket wrench.
Tighten the bolt securely to the manufacturer's recommended torque where specified.
Step 7 – Final Checks
Before using the mower:
- Check that the blade is securely fitted.
- Confirm the blade rotates freely without contacting the mower deck.
- Reconnect the spark plug cap.
- Start the engine and check for abnormal vibration or noise.
If excessive vibration occurs, stop the engine immediately and inspect the blade installation.
Frequently Asked Questions
How often should I replace my lawnmower blade?
Inspect the blade before each mowing season and replace it if it is bent, cracked, excessively worn or cannot be sharpened safely.
Can I sharpen my lawnmower blade instead of replacing it?
Yes. A blade that is only dull can often be sharpened. However, if the blade is bent, cracked or heavily worn, it should be replaced.
Should I replace the blade washer?
Yes. Fitting a new blade washer is recommended whenever the blade is replaced to help ensure the blade is secured correctly.
What happens if I fit the blade the wrong way round?
A blade fitted incorrectly may cut poorly, fail to lift the grass properly and could become unsafe during operation. Always check the blade orientation before tightening the blade bolt.
What should I do if the blade bolt will not loosen?
Secure the blade using a block of wood and use the correct size socket wrench to apply controlled force. Avoid striking the bolt or using excessive force that could damage the blade adaptor or crankshaft.
Why is my lawnmower vibrating after replacing the blade?
Excessive vibration may indicate that the blade has been installed incorrectly, the blade adaptor is damaged, the blade is unbalanced or the crankshaft has been bent following a previous impact.
How do I replace the blade adapter on my Petrol Lawnmower
The blade adapter, also known as the blade carrier or blade boss, connects the cutting blade to the engine crankshaft. If it becomes damaged, the blade may become loose, the mower may vibrate excessively or the cutting performance may be affected.
This guide explains how to replace the blade adapter on your petrol lawnmower.
Quick Answer
To replace the blade adapter on a petrol lawnmower:
- Remove the spark plug cap and safely access the underside of the mower.
- Remove the cutting blade.
- Remove the blade adapter from the crankshaft.
- Transfer or refit the parallel key if fitted.
- Install the new blade adapter.
- Refit the blade and tighten the blade bolt securely.
Always inspect the crankshaft and blade for damage before fitting a new blade adapter.
Before You Begin
Before carrying out this repair:
- Switch off the engine and allow it to cool completely.
- Remove the spark plug cap to prevent accidental starting.
- Wear suitable protective gloves when handling the blade.
- Position the mower on a stable surface.
- If the mower needs to be inverted, follow the manufacturer's guidance to prevent fuel or oil leaks.
Tools you may need:
- Socket wrench or suitable spanner
- Protective gloves
- Replacement blade adapter
- Replacement blade washer (recommended)
The blade adapter is designed to absorb impact if the blade strikes a solid object. If the mower has experienced a heavy impact, inspect the crankshaft for damage before replacing the adapter.
Steps
Step 1 – Remove the Blade
Using a suitable socket wrench or spanner:
- Remove the blade bolt.
- Remove the blade washer.
- Lift the blade from the blade adapter.
Take care when handling the blade, as the cutting edges may still be sharp.
Step 2 – Remove the Drive Belt (If Fitted)
If your mower is self-propelled and the blade adapter incorporates a drive pulley:
- Carefully remove the drive belt from the pulley section of the blade adapter.
- Inspect the belt for signs of wear or damage before refitting.
Skip this step if your mower is not fitted with a drive belt.
Step 3 – Locate the Parallel Key
Inspect the crankshaft for a parallel key fitted into the keyway.
The parallel key prevents the blade adapter from rotating on the crankshaft.
Carefully remove it if necessary and keep it safe for reassembly.
Step 4 – Remove the Blade Adapter
Grip the blade adapter and pull it away from the crankshaft.
If it is difficult to remove:
- Gently rock the adapter from side to side while pulling.
- Do not strike the crankshaft with a hammer, as this may cause damage.
Once removed, inspect the crankshaft and keyway for wear or damage.
Step 5 – Install the New Blade Adapter
Position the new blade adapter onto the crankshaft.
Ensure:
- The parallel key is correctly seated in the keyway.
- The adapter aligns correctly with the crankshaft.
- The adapter is pushed fully into position.
The adapter should fit securely without excessive movement.
Step 6 – Refit the Drive Belt
If your mower has a drive belt:
- Loop the belt over the pulley section of the blade adapter.
- Check that the belt is correctly seated on all pulleys.
Step 7 – Refit the Blade
Position the blade onto the mounting lugs or locating pins on the blade adapter.
Install:
- A new blade washer (recommended).
- The blade retaining bolt.
Tighten the blade bolt securely using a socket wrench or to the manufacturer's recommended torque where specified.
Step 8 – Perform Final Checks
Before reconnecting the spark plug cap:
- Check that the blade is securely fitted.
- Ensure the blade adapter is fully seated on the crankshaft.
- Confirm there is no movement or wobble.
- Rotate the blade carefully by hand to ensure it turns smoothly.
- Check that the drive belt is correctly positioned if fitted.
Reconnect the spark plug cap and test the mower in a safe area.
Frequently Asked Questions
What does the blade adapter do?
The blade adapter connects the cutting blade to the engine crankshaft and transfers power from the engine to the blade. It is also designed to absorb impact if the blade strikes a solid object.
What are the signs of a damaged blade adapter?
Common signs include excessive vibration, a loose blade, uneven cutting, visible cracks or damage to the adapter and unusual movement of the blade.
Can I continue using my lawnmower with a damaged blade adapter?
No. A damaged blade adapter may prevent the blade from being securely mounted and can create a serious safety hazard. It should be replaced before using the mower.
Should I inspect the crankshaft when replacing the blade adapter?
Yes. If the blade has struck a solid object, inspect the crankshaft for signs of bending or damage. A bent crankshaft can cause excessive vibration even after the blade adapter has been replaced.
What is the parallel key?
The parallel key is a small metal component that fits into the crankshaft keyway. It locks the blade adapter onto the crankshaft and prevents it from rotating independently.
Should I replace the blade washer when fitting a new blade adapter?
Yes. Replacing the blade washer whenever the blade is removed helps ensure the blade is secured correctly and reduces the risk of it loosening during operation.
How do I replace the drive belt on my Petrol Lawnmower
The drive belt is an essential part of the self-propel system on a petrol lawnmower. It transfers power from the engine to the gearbox, allowing the mower to drive forward when the self-propel lever is engaged.
This guide explains how to replace or refit the drive belt if it has become worn, damaged or has slipped off the pulleys.
Quick Answer
If your petrol lawnmower is not self-propelling, inspect the drive belt for damage or signs that it has slipped off the pulleys.
To replace or refit the drive belt:
- Remove the spark plug cap and safely access the underside of the mower.
- Remove the belt cover if fitted.
- Route the belt around the gearbox pulley.
- Align the belt with the engine pulley.
- Rotate the blade by hand to seat the belt correctly.
- Check the belt is correctly aligned before using the mower.
A belt that is cracked, stretched or badly worn should always be replaced.
Before You Begin
Before carrying out this repair:
- Switch off the engine and allow it to cool completely.
- Remove the spark plug cap to prevent accidental starting.
- Wear suitable protective gloves.
- Position the mower on a stable surface.
- If the mower needs to be inverted, follow the manufacturer's recommendations to prevent fuel or oil leaks.
Tools you may need:
- Screwdriver
- Socket or spanner
- Replacement drive belt (if required)
Inspect the new belt before installation to ensure it matches the original in size and profile.
Steps
Step 1 – Inspect the Drive Belt
Before removing or replacing the belt, inspect it for:
- Cracks.
- Fraying.
- Stretching.
- Missing sections.
- Signs that it has slipped from the pulleys.
If the belt is damaged, replace it. If it has simply come off, it may only need to be refitted.

Step 2 – Remove the Belt Cover (If Fitted)
Some mower models have a protective belt cover.
To remove it:
- Locate the belt cover between the blade assembly and gearbox.
- Remove the retaining screws or fixing bolts.
- Lift the cover away to expose the drive belt and pulleys.
Step 3 – Position the Belt
Feed the drive belt around the blade area first.
Do not fully fit the belt onto the engine pulley at this stage.
Ensure the belt is routed correctly and is not twisted.
Step 4 – Route the Belt Through the Deck
Guide the belt underneath the belt guide or mower deck as designed.
Check that:
- The belt is sitting correctly.
- It is not trapped beneath the belt guard.
- There are no twists along its length.
Step 5 – Fit the Belt to the Gearbox Pulley
Loop the belt around the gearbox pulley.
The gearbox may move slightly as tension is applied, which is normal.
Ensure the belt sits fully within the pulley groove.
Step 6 – Fit the Belt to the Engine Pulley
Position the belt in line with the engine or blade drive pulley.
While wearing protective gloves:
- Slowly rotate the blade by hand.
- Allow the belt to walk onto the engine pulley naturally.
- Continue rotating until the belt is fully seated.
Do not force the belt onto the pulley using tools, as this may damage the belt.
Step 7 – Check Belt Alignment
Before reassembling the mower:
- Check that the belt sits correctly in both pulley grooves.
- Ensure there are no twists.
- Rotate the blade by hand to confirm the belt runs smoothly.
- Refit the belt cover if it was removed.
Reconnect the spark plug cap and test the self-propel function in a safe area.
Frequently Asked Questions
What does the drive belt do on a petrol lawnmower?
The drive belt transfers power from the engine to the gearbox, allowing the self-propel system to drive the mower forward.
How do I know if my drive belt needs replacing?
Replace the belt if it is cracked, frayed, stretched, glazed or has become damaged. A belt that has simply slipped off may only need to be refitted.
Why has my lawnmower drive belt come off?
The belt can come off due to wear, incorrect tension, damaged pulleys, impact damage or because another component has been removed during maintenance.
Can I reuse a drive belt that has slipped off?
Yes. If the belt is in good condition and shows no signs of damage or excessive wear, it can usually be refitted.
Why is my self-propel still not working after replacing the drive belt?
If the self-propel system still does not operate, inspect the drive cable, gearbox, pulleys and drive mechanism for wear or damage. The fault may not be caused by the drive belt alone.
Should the drive belt be tight?
Yes. The belt should have sufficient tension to transfer power efficiently while remaining correctly seated on both pulleys. Excessive slack or twisting can prevent the self-propel system from operating correctly.
How to test the spark plug
If your petrol garden machine will not start, testing the spark plug is one of the first checks you should carry out. A faulty or dirty spark plug can prevent the engine from producing the spark needed to ignite the fuel.
This guide explains how to clean and test the spark plug safely.
Quick Answer
To test a spark plug:
- Remove the spark plug from the engine.
- Reconnect it to the spark plug cap.
- Hold the threaded metal body against a clean metal part of the engine.
- Hold the engine brake or start lever (if fitted).
- Pull the starter cord and look for a strong blue or white spark at the electrode.
If there is no visible spark, the spark plug or ignition system may be faulty.
Before You Begin
Before testing the spark plug:
- Switch off the engine and allow it to cool completely.
- Work in a well-ventilated area away from fuel vapours or other sources of ignition.
- Wear suitable personal protective equipment (PPE), including gloves and eye protection.
- Carry out the test in a shaded area where the spark is easier to see.
Tools required:
- Spark plug spanner or spark plug socket

- Wire brush
- Clean cloth
Take care not to touch the metal parts of the spark plug while carrying out the spark test.
Steps
Step 1 – Clean the Spark Plug
Before testing, inspect the spark plug for:
- Carbon deposits.
- Dirt.
- Oil contamination.
- Damaged electrodes.
Clean the spark plug using a wire brush or wipe it with a clean cloth lightly dampened with petrol.
Ensure the electrode is clean before testing.
Step 2 – Remove the Spark Plug
Pull the spark plug cap from the spark plug.
Using a spark plug spanner:
- Turn the spark plug anti-clockwise.
- Remove it carefully from the engine.
Inspect the spark plug for signs of excessive wear or damage.
Step 3 – Reconnect the Spark Plug
Insert the spark plug back into the spark plug cap.
Allow it to hang securely from the ignition lead.
Step 4 – Earth the Spark Plug
Press the threaded metal body of the spark plug firmly against a clean, unpainted metal part of the engine.
This provides the earth connection required for the spark test.
Step 5 – Test for a Spark
If your machine has an engine brake or start lever, hold it in the operating position.
Pull the starter cord as though starting the engine.
Watch the tip of the spark plug carefully.
A healthy ignition system should produce a strong blue or white spark across the electrodes.
Frequently Asked Questions
How do I know if my spark plug is working?
A working spark plug produces a strong blue or white spark across the electrodes each time the engine is turned over.
What if there is no spark?
If there is no spark after cleaning the plug, replace it with a new spark plug of the correct specification.
If a new spark plug also fails to spark, the fault may lie with the ignition coil, ignition lead or stop/start circuit.
Can a dirty spark plug stop a petrol engine from starting?
Yes. Carbon deposits, oil contamination or excessive wear can prevent the spark plug from producing a reliable spark, making the engine difficult or impossible to start.
Should I clean or replace the spark plug?
A lightly contaminated spark plug can often be cleaned and reused. Replace the spark plug if it is damaged, heavily fouled, the electrode is worn or cleaning does not restore a good spark.
What else should I check if the spark plug is working?
If a strong spark is present but the engine still will not start, check:
- The fuel is fresh and less than 30 days old.
- The engine oil is at the correct level.
- The air filter is clean.
- The engine brake cable is correctly adjusted.
- Fuel is reaching the carburettor.
Is it safe to test a spark plug by holding it?
Always hold the spark plug by the insulated cap or ignition lead and keep your hands away from the metal body during the test to avoid receiving an electric shock.
How to clean out your carburettor
If your petrol garden machine has been left unused for several weeks or months, old fuel can leave deposits inside the carburettor. This can restrict fuel flow, making the engine difficult to start, run poorly or stall during operation.
This guide explains how to drain the carburettor and refill the machine with fresh petrol.
Quick Answer
If your petrol garden machine is difficult to start after being stored, drain the old fuel from the carburettor, refit the drain bolt and refill the fuel tank with fresh unleaded petrol.
In many cases, replacing stale fuel is enough to restore normal engine performance.
Before You Begin
Before carrying out this procedure:
- Switch off the engine and allow it to cool completely.
- Work in a well-ventilated outdoor area away from naked flames, sparks and other sources of ignition.
- Wear suitable personal protective equipment (PPE), including gloves and eye protection.
- Keep a suitable metal or fuel-safe container ready to collect the drained fuel.
Tools required:
- 10 mm spanner or socket
- Metal or fuel-safe collection container
- Fresh unleaded petrol
Important: Petrol is highly flammable. Handle fuel carefully and dispose of old petrol in accordance with local regulations.
Steps
Step 1 – Position the Fuel Container
Place a suitable metal or fuel-safe container directly beneath the carburettor drain bolt.
This will safely collect the fuel as it drains from the carburettor.
Step 2 – Remove the Drain Bolt
Using a 10 mm spanner or socket:
- Turn the carburettor drain bolt anti-clockwise.
- Carefully remove the drain bolt.
Fuel will begin to drain immediately.
Step 3 – Drain the Carburettor
Allow all fuel to drain from the carburettor into the container.
If the fuel tank is full and the fuel tap is open (where fitted), fuel may continue to drain until the tank is empty.
Inspect the drained fuel for signs of water, dirt or contamination, which may indicate a fuel quality issue.
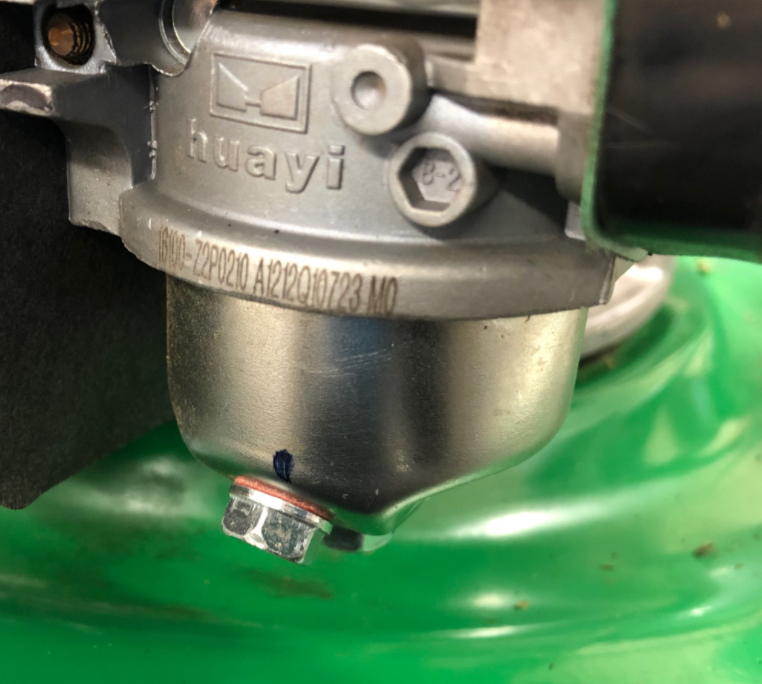
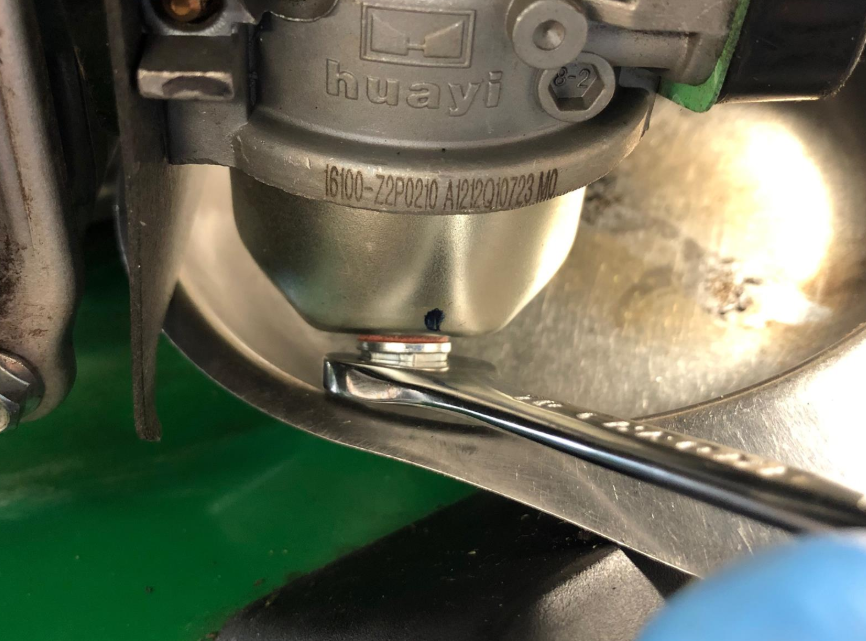
Step 4 – Refit the Drain Bolt
Once the fuel has completely drained:
- Reinstall the drain bolt.
- Tighten it securely using the spanner or socket.
Do not overtighten, as this may damage the carburettor.
Step 5 – Refill with Fresh Fuel
Fill the fuel tank with fresh unleaded petrol that is no more than 30 days old.
If your machine is fitted with a primer bulb, press it as recommended in the user manual to refill the carburettor with fresh fuel.
Start the engine using the normal starting procedure.
Frequently Asked Questions
Why should I drain the carburettor?
Old petrol can deteriorate over time, leaving varnish and deposits inside the carburettor. Draining the old fuel and replacing it with fresh petrol can improve starting and engine performance.
How long can petrol be left in a carburettor?
Petrol can begin to degrade in as little as 30 days, particularly if the machine is stored without a fuel stabiliser. Using fresh fuel helps prevent carburettor blockages.
Will draining the carburettor fix starting problems?
If stale fuel is the cause, draining the carburettor and refilling with fresh petrol can often resolve the issue. If problems continue, inspect the air filter, spark plug and fuel system.
Why does fuel keep draining after I remove the drain bolt?
If the fuel tank is full and the fuel tap is open, fuel may continue flowing through the carburettor until the tank is empty. This is normal on many petrol garden machines.
What should I do with the old fuel?
Dispose of old petrol at a local household waste recycling centre or authorised hazardous waste facility. Never pour fuel onto the ground, into drains or into household waste.
What if my machine still won't start after draining the carburettor?
If fresh fuel does not resolve the problem, inspect the spark plug, air filter and fuel lines, and check that fuel is reaching the carburettor. A blocked carburettor jet or other fuel system fault may require further maintenance.
If your petrol garden machine has been left unused for several weeks or months, old fuel can leave deposits inside the carburettor. This can restrict fuel flow, making the engine difficult to start, run poorly or stall during operation.
This guide explains how to drain the carburettor and refill the machine with fresh petrol.
Quick Answer
If your petrol garden machine is difficult to start after being stored, drain the old fuel from the carburettor, refit the drain bolt and refill the fuel tank with fresh unleaded petrol.
In many cases, replacing stale fuel is enough to restore normal engine performance.
Before You Begin
Before carrying out this procedure:
- Switch off the engine and allow it to cool completely.
- Work in a well-ventilated outdoor area away from naked flames, sparks and other sources of ignition.
- Wear suitable personal protective equipment (PPE), including gloves and eye protection.
- Keep a suitable metal or fuel-safe container ready to collect the drained fuel.
Tools required:
- 10 mm spanner or socket
- Metal or fuel-safe collection container
- Fresh unleaded petrol
Important: Petrol is highly flammable. Handle fuel carefully and dispose of old petrol in accordance with local regulations.
Steps
Step 1 – Position the Fuel Container
Place a suitable metal or fuel-safe container directly beneath the carburettor drain bolt.
This will safely collect the fuel as it drains from the carburettor.
Step 2 – Remove the Drain Bolt
Using a 10 mm spanner or socket:
- Turn the carburettor drain bolt anti-clockwise.
- Carefully remove the drain bolt.
Fuel will begin to drain immediately.
Step 3 – Drain the Carburettor
Allow all fuel to drain from the carburettor into the container.
If the fuel tank is full and the fuel tap is open (where fitted), fuel may continue to drain until the tank is empty.
Inspect the drained fuel for signs of water, dirt or contamination, which may indicate a fuel quality issue.
Step 4 – Refit the Drain Bolt
Once the fuel has completely drained:
- Reinstall the drain bolt.
- Tighten it securely using the spanner or socket.
Do not overtighten, as this may damage the carburettor.
Step 5 – Refill with Fresh Fuel
Fill the fuel tank with fresh unleaded petrol that is no more than 30 days old.
If your machine is fitted with a primer bulb, press it as recommended in the user manual to refill the carburettor with fresh fuel.
Start the engine using the normal starting procedure.
Frequently Asked Questions
Why should I drain the carburettor?
Old petrol can deteriorate over time, leaving varnish and deposits inside the carburettor. Draining the old fuel and replacing it with fresh petrol can improve starting and engine performance.
How long can petrol be left in a carburettor?
Petrol can begin to degrade in as little as 30 days, particularly if the machine is stored without a fuel stabiliser. Using fresh fuel helps prevent carburettor blockages.
Will draining the carburettor fix starting problems?
If stale fuel is the cause, draining the carburettor and refilling with fresh petrol can often resolve the issue. If problems continue, inspect the air filter, spark plug and fuel system.
Why does fuel keep draining after I remove the drain bolt?
If the fuel tank is full and the fuel tap is open, fuel may continue flowing through the carburettor until the tank is empty. This is normal on many petrol garden machines.
What should I do with the old fuel?
Dispose of old petrol at a local household waste recycling centre or authorised hazardous waste facility. Never pour fuel onto the ground, into drains or into household waste.
What if my machine still won't start after draining the carburettor?
If fresh fuel does not resolve the problem, inspect the spark plug, air filter and fuel lines, and check that fuel is reaching the carburettor. A blocked carburettor jet or other fuel system fault may require further maintenance.
View Article