How to clean out your carburettor
Modified on Wed, 1 Jul at 11:28 AM
If your petrol garden machine has been left unused for several weeks or months, old fuel can leave deposits inside the carburettor. This can restrict fuel flow, making the engine difficult to start, run poorly or stall during operation.
This guide explains how to drain the carburettor and refill the machine with fresh petrol.
Quick Answer
If your petrol garden machine is difficult to start after being stored, drain the old fuel from the carburettor, refit the drain bolt and refill the fuel tank with fresh unleaded petrol.
In many cases, replacing stale fuel is enough to restore normal engine performance.
Before You Begin
Before carrying out this procedure:
- Switch off the engine and allow it to cool completely.
- Work in a well-ventilated outdoor area away from naked flames, sparks and other sources of ignition.
- Wear suitable personal protective equipment (PPE), including gloves and eye protection.
- Keep a suitable metal or fuel-safe container ready to collect the drained fuel.
Tools required:
- 10 mm spanner or socket
- Metal or fuel-safe collection container
- Fresh unleaded petrol
Important: Petrol is highly flammable. Handle fuel carefully and dispose of old petrol in accordance with local regulations.
Steps
Step 1 – Position the Fuel Container
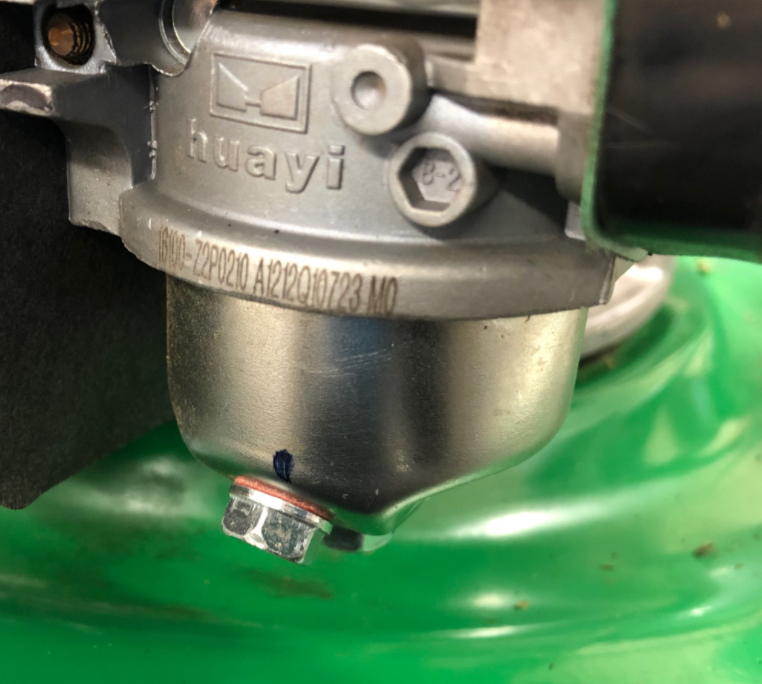
Place a suitable metal or fuel-safe container directly beneath the carburettor drain bolt.
This will safely collect the fuel as it drains from the carburettor.
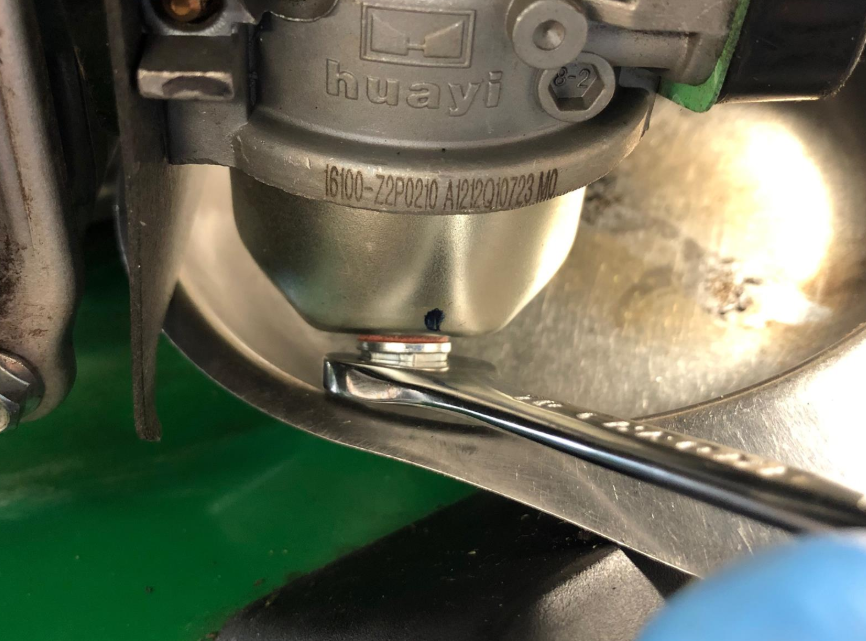
Step 2 – Remove the Drain Bolt
Using a 10 mm spanner or socket:
- Turn the carburettor drain bolt anti-clockwise.
- Carefully remove the drain bolt.
Fuel will begin to drain immediately.
Step 3 – Drain the Carburettor
Allow all fuel to drain from the carburettor into the container.
If the fuel tank is full and the fuel tap is open (where fitted), fuel may continue to drain until the tank is empty.
Inspect the drained fuel for signs of water, dirt or contamination, which may indicate a fuel quality issue.
Step 4 – Refit the Drain Bolt
Once the fuel has completely drained:
- Reinstall the drain bolt.
- Tighten it securely using the spanner or socket.
Do not overtighten, as this may damage the carburettor.
Step 5 – Refill with Fresh Fuel
Fill the fuel tank with fresh unleaded petrol that is no more than 30 days old.
If your machine is fitted with a primer bulb, press it as recommended in the user manual to refill the carburettor with fresh fuel.
Start the engine using the normal starting procedure.
Frequently Asked Questions
Why should I drain the carburettor?
Old petrol can deteriorate over time, leaving varnish and deposits inside the carburettor. Draining the old fuel and replacing it with fresh petrol can improve starting and engine performance.
How long can petrol be left in a carburettor?
Petrol can begin to degrade in as little as 30 days, particularly if the machine is stored without a fuel stabiliser. Using fresh fuel helps prevent carburettor blockages.
Will draining the carburettor fix starting problems?
If stale fuel is the cause, draining the carburettor and refilling with fresh petrol can often resolve the issue. If problems continue, inspect the air filter, spark plug and fuel system.
Why does fuel keep draining after I remove the drain bolt?
If the fuel tank is full and the fuel tap is open, fuel may continue flowing through the carburettor until the tank is empty. This is normal on many petrol garden machines.
What should I do with the old fuel?
Dispose of old petrol at a local household waste recycling centre or authorised hazardous waste facility. Never pour fuel onto the ground, into drains or into household waste.
What if my machine still won't start after draining the carburettor?
If fresh fuel does not resolve the problem, inspect the spark plug, air filter and fuel lines, and check that fuel is reaching the carburettor. A blocked carburettor jet or other fuel system fault may require further maintenance.
If your petrol garden machine has been left unused for several weeks or months, old fuel can leave deposits inside the carburettor. This can restrict fuel flow, making the engine difficult to start, run poorly or stall during operation.
This guide explains how to drain the carburettor and refill the machine with fresh petrol.
Quick Answer
If your petrol garden machine is difficult to start after being stored, drain the old fuel from the carburettor, refit the drain bolt and refill the fuel tank with fresh unleaded petrol.
In many cases, replacing stale fuel is enough to restore normal engine performance.
Before You Begin
Before carrying out this procedure:
- Switch off the engine and allow it to cool completely.
- Work in a well-ventilated outdoor area away from naked flames, sparks and other sources of ignition.
- Wear suitable personal protective equipment (PPE), including gloves and eye protection.
- Keep a suitable metal or fuel-safe container ready to collect the drained fuel.
Tools required:
- 10 mm spanner or socket
- Metal or fuel-safe collection container
- Fresh unleaded petrol
Important: Petrol is highly flammable. Handle fuel carefully and dispose of old petrol in accordance with local regulations.
Steps
Step 1 – Position the Fuel Container
Place a suitable metal or fuel-safe container directly beneath the carburettor drain bolt.
This will safely collect the fuel as it drains from the carburettor.
Step 2 – Remove the Drain Bolt
Using a 10 mm spanner or socket:
- Turn the carburettor drain bolt anti-clockwise.
- Carefully remove the drain bolt.
Fuel will begin to drain immediately.
Step 3 – Drain the Carburettor
Allow all fuel to drain from the carburettor into the container.
If the fuel tank is full and the fuel tap is open (where fitted), fuel may continue to drain until the tank is empty.
Inspect the drained fuel for signs of water, dirt or contamination, which may indicate a fuel quality issue.
Step 4 – Refit the Drain Bolt
Once the fuel has completely drained:
- Reinstall the drain bolt.
- Tighten it securely using the spanner or socket.
Do not overtighten, as this may damage the carburettor.
Step 5 – Refill with Fresh Fuel
Fill the fuel tank with fresh unleaded petrol that is no more than 30 days old.
If your machine is fitted with a primer bulb, press it as recommended in the user manual to refill the carburettor with fresh fuel.
Start the engine using the normal starting procedure.
Frequently Asked Questions
Why should I drain the carburettor?
Old petrol can deteriorate over time, leaving varnish and deposits inside the carburettor. Draining the old fuel and replacing it with fresh petrol can improve starting and engine performance.
How long can petrol be left in a carburettor?
Petrol can begin to degrade in as little as 30 days, particularly if the machine is stored without a fuel stabiliser. Using fresh fuel helps prevent carburettor blockages.
Will draining the carburettor fix starting problems?
If stale fuel is the cause, draining the carburettor and refilling with fresh petrol can often resolve the issue. If problems continue, inspect the air filter, spark plug and fuel system.
Why does fuel keep draining after I remove the drain bolt?
If the fuel tank is full and the fuel tap is open, fuel may continue flowing through the carburettor until the tank is empty. This is normal on many petrol garden machines.
What should I do with the old fuel?
Dispose of old petrol at a local household waste recycling centre or authorised hazardous waste facility. Never pour fuel onto the ground, into drains or into household waste.
What if my machine still won't start after draining the carburettor?
If fresh fuel does not resolve the problem, inspect the spark plug, air filter and fuel lines, and check that fuel is reaching the carburettor. A blocked carburettor jet or other fuel system fault may require further maintenance.
Was this article helpful?
That’s Great!
Thank you for your feedback
Sorry! We couldn't be helpful
Thank you for your feedback
Feedback sent
We appreciate your effort and will try to fix the article