How do I replace the fuel lines on my Petrol Strimmer/Brush Cutter
Modified on Tue, 30 Jun at 4:17 PM
Quick Answer
If your petrol strimmer or brush cutter is difficult to start, leaking fuel, or running inconsistently, the fuel lines may be cracked, blocked, or detached. Replacing them involves feeding new fuel hoses through the tank, fitting the fuel filter, and correctly routing both inlet and outlet lines to the carburettor.
⚠️ Safety Notice
Before starting:
- Switch off the engine and allow it to cool completely.
- Work in a well-ventilated area away from ignition sources.
- Drain any remaining fuel before beginning the repair.
- Wear protective gloves, as fuel can irritate skin.
Petrol is highly flammable. Take care at all times.
When Do Fuel Lines Need Replacing?
Fuel lines may need replacing if:
- The engine is difficult to start
- Fuel is leaking from the machine
- The engine cuts out under load
- The fuel lines are cracked, brittle, or damaged
- The primer bulb does not fill correctly
Before You Begin
Most machines use two fuel hoses:
- Outlet hose (longer hose) – supplies fuel from tank to carburettor
- Inlet hose (shorter hose) – returns fuel or connects to primer system
To make installation easier, you can soften the hoses by placing them in warm water for a few minutes before fitting.
Replacing the Fuel Lines
Step 1 – Feed the Fuel Line Through the Tank
- Locate the fuel line opening in the fuel tank.
- Insert the new fuel line from outside the tank.
- Push it through until a small section is visible inside the fuel filler opening.

Step 2 – Fit the Fuel Filter
- Through the fuel filler opening, pull enough line through to access the inside of the tank.
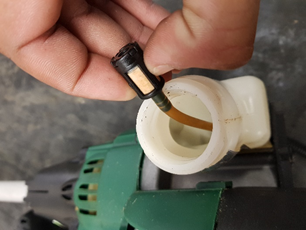
2. Attach the fuel filter securely to the end of the outlet fuel line.
3. Pull the fuel line back so the filter sits freely inside the tank.
4. Ensure the filter can move freely and reach fuel at all times.
Step 3 – Connect the Fuel Lines
- Route the outlet hose (longer line) to the carburettor fuel inlet.
- Connect the inlet hose (shorter line) to the primer bulb or return connection (depending on model).
- Ensure both hoses are pushed firmly onto their fittings.

Step 4 – Check the Installation
Before refilling or starting the machine:
- Ensure the fuel filter is fully inside the tank.
- Confirm the filter moves freely without restriction.
- Check that hoses are not kinked, twisted, or pinched.
- Verify all connections are tight and secure.
Final Checks
Before starting the engine:
- Check for any signs of fuel leakage.
- Confirm correct routing of both fuel lines.
- Ensure the primer bulb fills correctly when pressed.
- Refill with the correct fuel mixture if required.
Frequently Asked Questions
Why do fuel lines fail?
Fuel lines commonly degrade over time due to fuel exposure, heat, and age, becoming brittle or cracked.
What happens if fuel lines are connected incorrectly?
Incorrect routing can cause starting issues, fuel starvation, or flooding.
Can I reuse old fuel lines?
No. Once fuel lines become hard, cracked, or loose, they should always be replaced.
Why does my primer bulb not fill after replacing fuel lines?
This usually indicates incorrect hose routing or a loose connection at the carburettor or primer bulb.
Was this article helpful?
That’s Great!
Thank you for your feedback
Sorry! We couldn't be helpful
Thank you for your feedback
Feedback sent
We appreciate your effort and will try to fix the article