How do I fit the strimmer head to my Petrol Strimmer/Brush Cutter
Modified on Tue, 30 Jun at 4:10 PM
Quick Answer
To fit or replace the strimmer line, you need to remove the spool, wind new line evenly onto the spool, refit it into the housing, and reinstall the cover. Correct winding direction and even tension are essential for reliable feeding during use.
⚠️ Safety Notice
Before carrying out any maintenance:
- Switch off the engine and allow it to cool completely.
- Remove the spark plug cap to prevent accidental starting.
- Wear protective gloves when handling the spool and line.
- Ensure the cutting head is fully stationary.
Table of Contents
- Removing the Spool
- Fitting New Strimmer Line
- Refitting the Spool
- Reinstalling the Cover
- Adjusting the Line Length
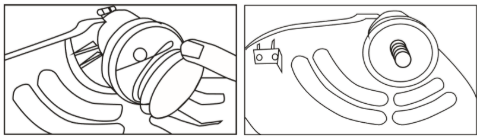
Removing the Spool
- Remove the spool cover / bolt cap.
- Carefully lift off the cover and set aside the spring. Take care not to lose it.
- Remove the spool from the housing.
- Discard any remaining or worn strimmer line.
Fitting New Strimmer Line
- Create a small bend or nick in the centre of the new line.

- Hook the centre of the line into the slot in the middle of the spool.
- Wind the line evenly onto both sides of the spool, following the directional arrows marked on the spool.
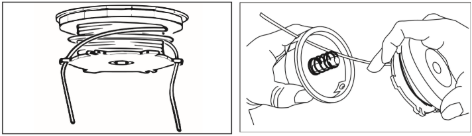
Ensure the line is wound neatly and evenly to prevent tangling or poor feeding during operation.
Refitting the Spool
- Secure both ends of the line into the retaining slots on the spool.
- Feed both line ends through the eyelets in the spool housing.
- Carefully insert the spool and spring back into the housing.
- Pull both line ends gently through the eyelets while pushing the spool into position.
- Press the spool down and rotate it clockwise until it reaches the stop point.
- Hold the spool in position and rotate it back slightly to ensure it locks securely.

Reinstalling the Cover
- Refit the spool cover / bolt cap.
- Tighten by hand only.
Do not overtighten, as this may damage the spool housing or restrict line feed.
Adjusting the Line Length
- Press the underside of the spool firmly by hand.
- Pull both line ends evenly until they extend slightly beyond the edge of the safety guard.
- Ensure both sides are equal in length and feed freely.
The strimmer head is now ready for use.
Frequently Asked Questions
Why does my strimmer line keep breaking?
This is usually caused by cutting thick material, incorrect line thickness, or worn spool components.
Why won’t the line feed automatically?
The line may be wound incorrectly, the spool may be jammed, or the eyelets may be blocked with debris.
Do I need to use a specific type of line?
Yes. Always use the diameter and type of line recommended for your model.
Why is one side of the line longer than the other?
This usually means the line was not wound evenly onto the spool during installation.
Was this article helpful?
That’s Great!
Thank you for your feedback
Sorry! We couldn't be helpful
Thank you for your feedback
Feedback sent
We appreciate your effort and will try to fix the article